Tutorial Header: Create Your Template, Tutorial Image: , Tutorial Content:
If this is your first time running this report, you will need to select ADD to create a template. If you already have a template that you want to update, highlight the name of that template and select EDIT.
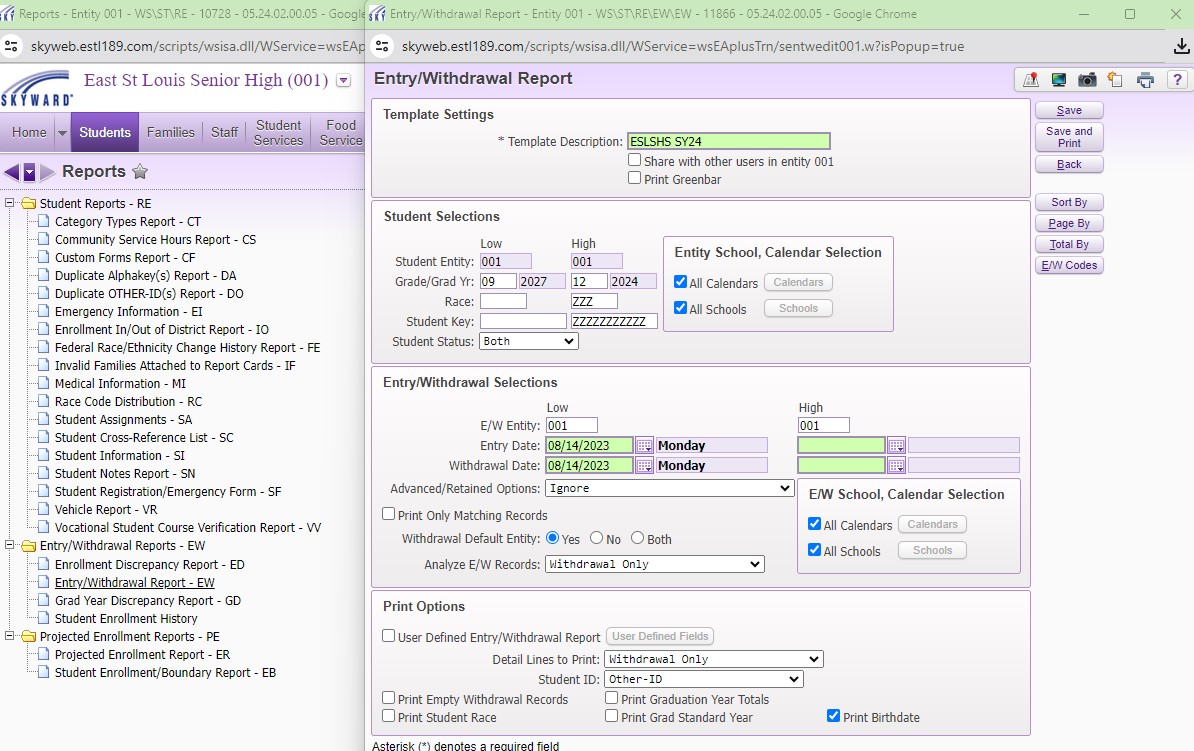
To capture all students who may have entered and withdrawn in the same school year, leave the Student ranges wide open as well as Include all Calendars and Schools.
Under Entry/Withdrawal Selections, set the date ranges. Set the Entry and Withdrawal Date ranges with the school year calendar dates (school year you want the data for).
Select IGNORE for the Advanced/ Retained Options.
Select which type of records to review for the ANALYZE E/W RECORDS option. If you specifically looking to find data related to students who have been withdrawn for the current school year, select the "Withdrawal Only" option.
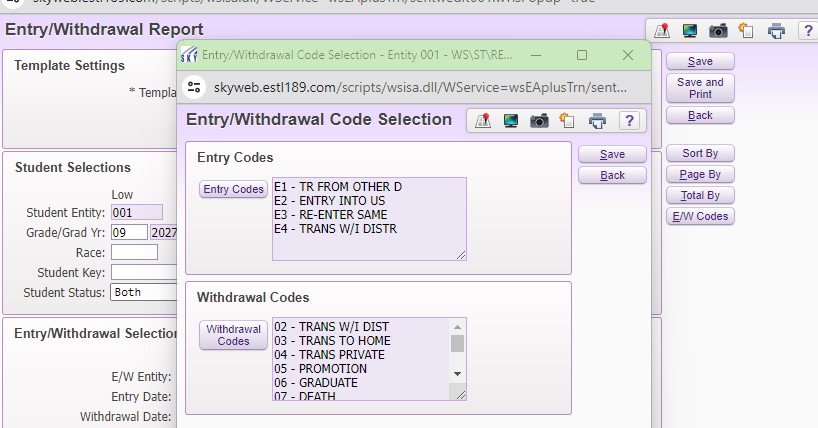
Prior to running the report, you will need to select specific Entry and Withdrawal codes. Only students with those specified entry and withdrawal codes will print on the report. Click on the E/W CODES button in the upper righthand corner to choose your codes.
To ensure you capture all students, it is recommended that you use the SELECT ALL option. Click the Entry Codes button and select the desired codes. Then click on the Withdrawal Codes button and select the desired codes.
You can customize your report with the USER DEFINED FIELDS option but you will likely find the Skyward default options that are available will provide you with the desired information.
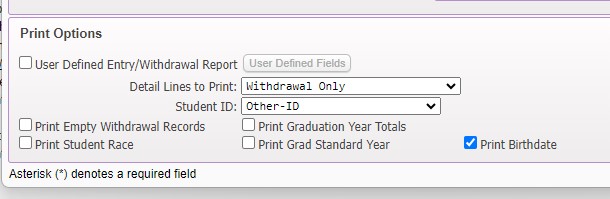
The details to print can be entry details only, withdrawal details only, or both. Depending on your needs, you may want to change this setting.
You can also include information for each student that includes race, birthdate, and graduation year.
Once you are ready to run the report, click SAVE AND PRINT. The report will separate the students by grade level. If you scroll to the last page, the report finishes with a total for all the students included.
The Skyward Entry/ Withdrawal Report can be set up to provide many different types of information related Entries and Withdrawals for a specific school year.
To access this report, you will need to be on the Student Management side of Skyward. Select the STUDENTS button and then scroll down to...
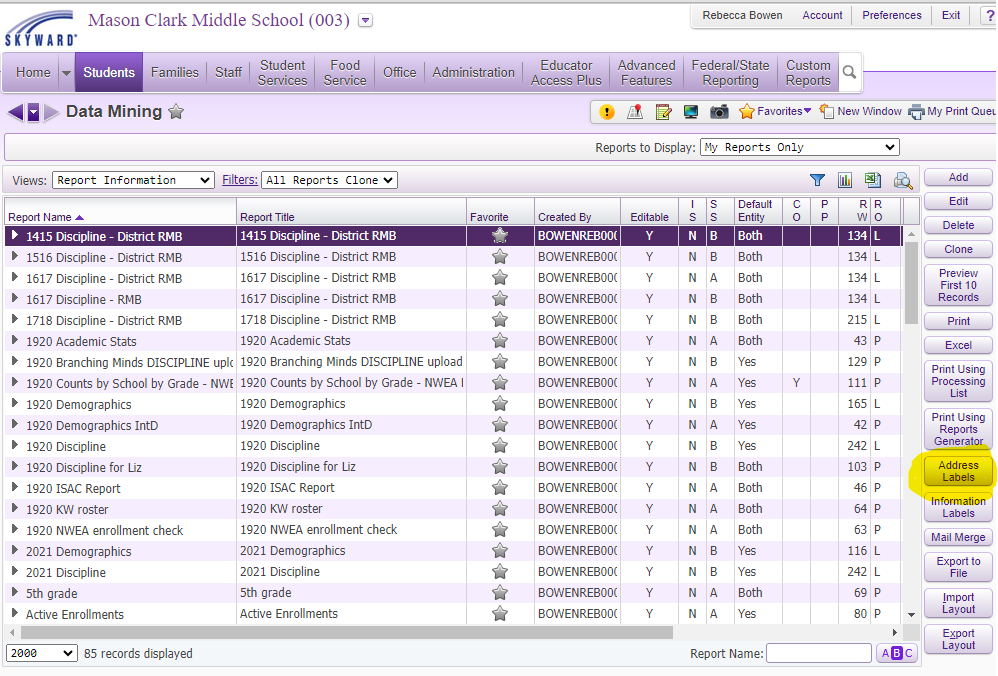
Click on STUDENTS and then select the Dating Mining - DM option. Once in Data Mining, look toward the bottom left the see the ADDRESS LABELS button. Click on that to set up the labels you need.
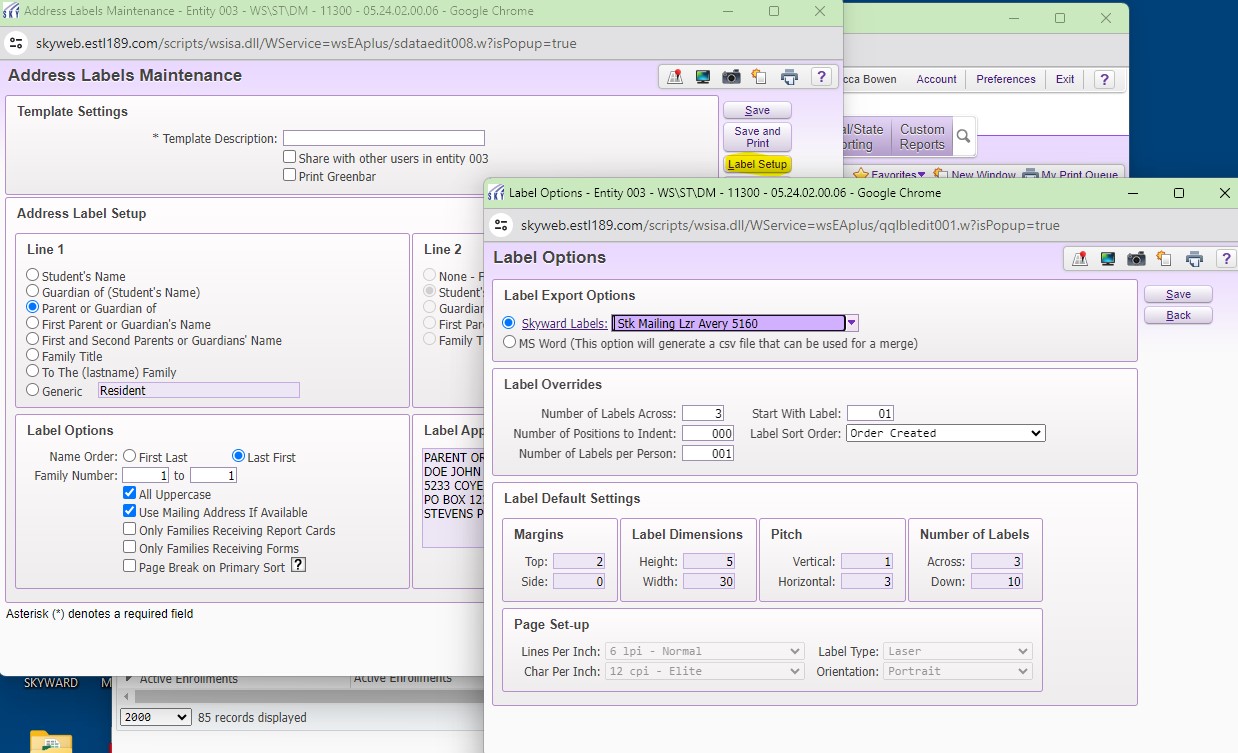
There is a Skyward template automatically available here that will print the names of students and their addresses on an Avery 5160 template for all your active students. If something different is needed, you will add and customize a new template.
If you would like to use a different address label size or change the fields that will be printed, select the ADD button to create a new template. You will name the template under Template Description and then select the items you want for your printed label.
If you are using a different style or size of labels, select the LABEL SETUP button to the right to make the needed changes.
Tutorial Header: Labels for Specified Groups, Tutorial Content:
It is possible to print labels for a specified group of students that meets a certain criteria - for example, only 5th Grade students. This must be set up as a template in Data Mining with the selected field limited to a specific range.
Once that Data Mining report is available, highlight the report in Data Mining, click on the ADDRESS LABELS button to the right, select the desired template for the labels, and then PRINT.
The labels that are generated will now be only those students who are within the range of that limited field as defined in your report.
Printing Address Labels from Skyward can be done through the Data Mining field under STUDENTS on the Student Management side of the system.
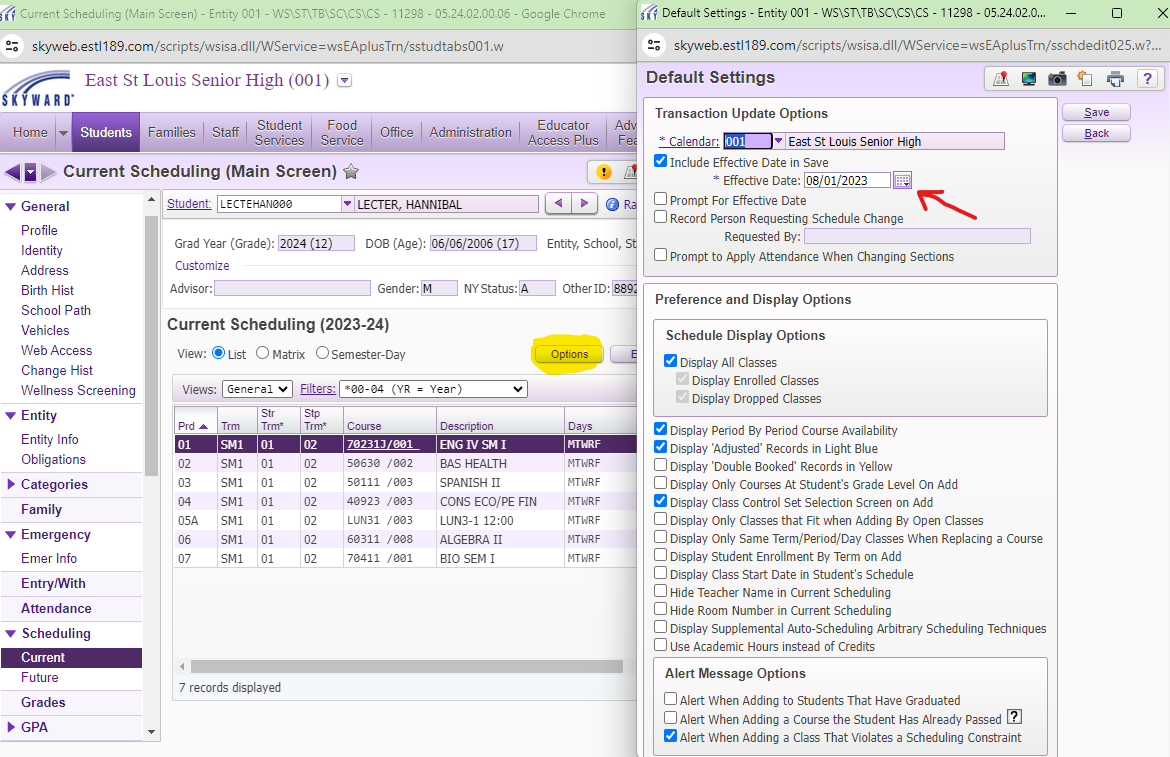
Setting a Default Course Effective Date at the beginning of the year will ensure that the courses scheduled to a student are always on or before the entry date.
Select the OPTIONS button under the Current Scheduling tab in the student's profile. From the calendar options, select the calendar that matches the calendar in the student's ENTRY/ WITHDRAWAL tab and set the effective date to be on or before the entry date.
BEST PRACTICE: set the effective date in your Default Settings to 8/1/20XX to ensure the date is always before the entry date. For schools with only one calendar, no other changes are needed. For schools with multiple calendars, you will need to adjust the calendar to match the student's grade level.
Tutorial Header: Updating Course Effective Dates for an Existing Schedule, Tutorial Image: , Tutorial Content:
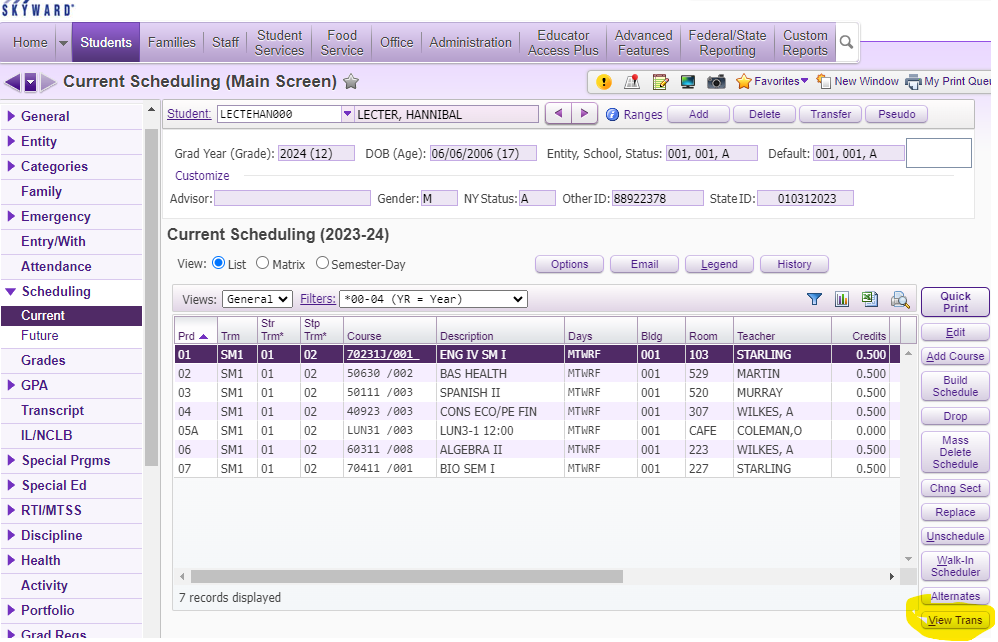
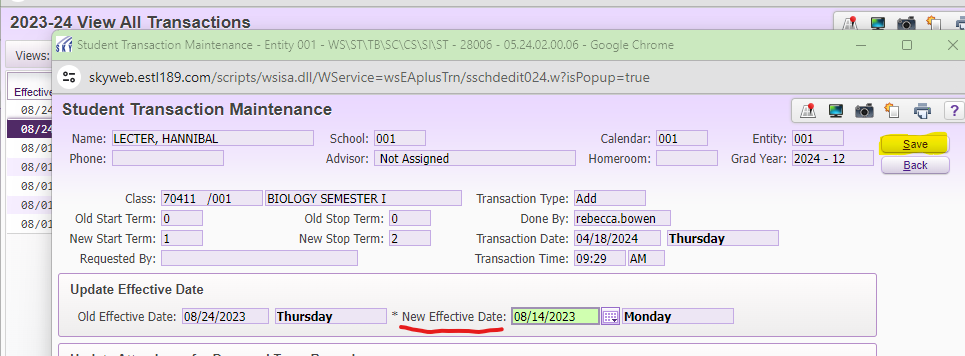
You may at times encounter a situation where a student's course effective dates need to be updated after a schedule has already been attach to a student. This may happen if a schedule was put on a student after the student started and the Default Setting Option was not used.
To update the Course Effective Dates, go to CURRENT SCHEDULING and select the VIEW TRANS button to the bottom right.
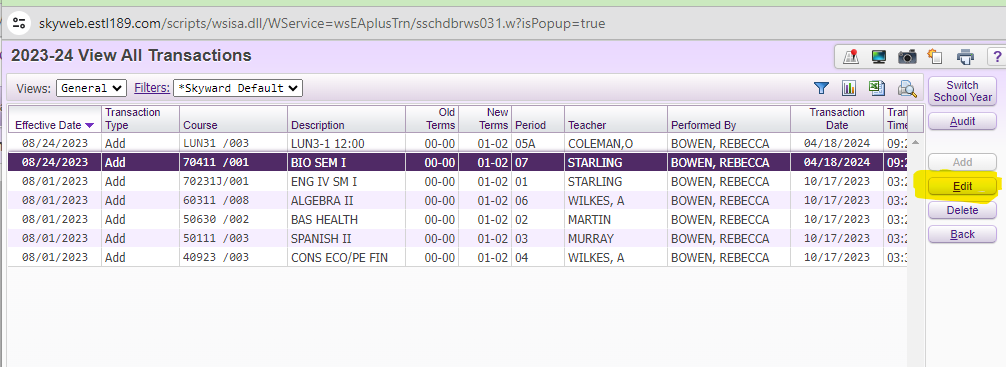
Once you have selected the VIEW TRANS button, a new window will pop up that shows all the courses, their Course Effective Dates, the date the transaction occurred, and who performed the transaction.
Highlight the course that needs to be updated and then select the EDIT button to the right of the window.
Update the NEW EFFECTIVE DATE with a date that is on or before the entry date and then select SAVE.
The Course Effective Date on a student's schedule is important to ensure that the student is able to earn attendance (because he has enough minutes scheduled for a complete day) and for the teacher to have the student available in Skyward for grades and posting daily attendance.
The Course...
Tutorial Header: Message Center, Tutorial Image: , Tutorial Content:
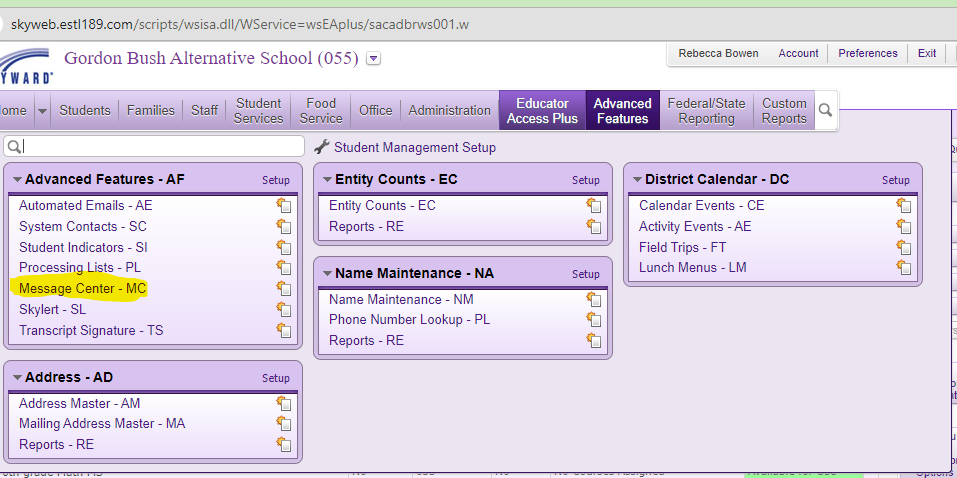
In Skyward, go to the Advanced Features tab at the top. Under the Advanced Features field, click on the MESSAGE CENTER - MC option.
Tutorial Header: Adding a New Communication, Tutorial Image: , Tutorial Content:
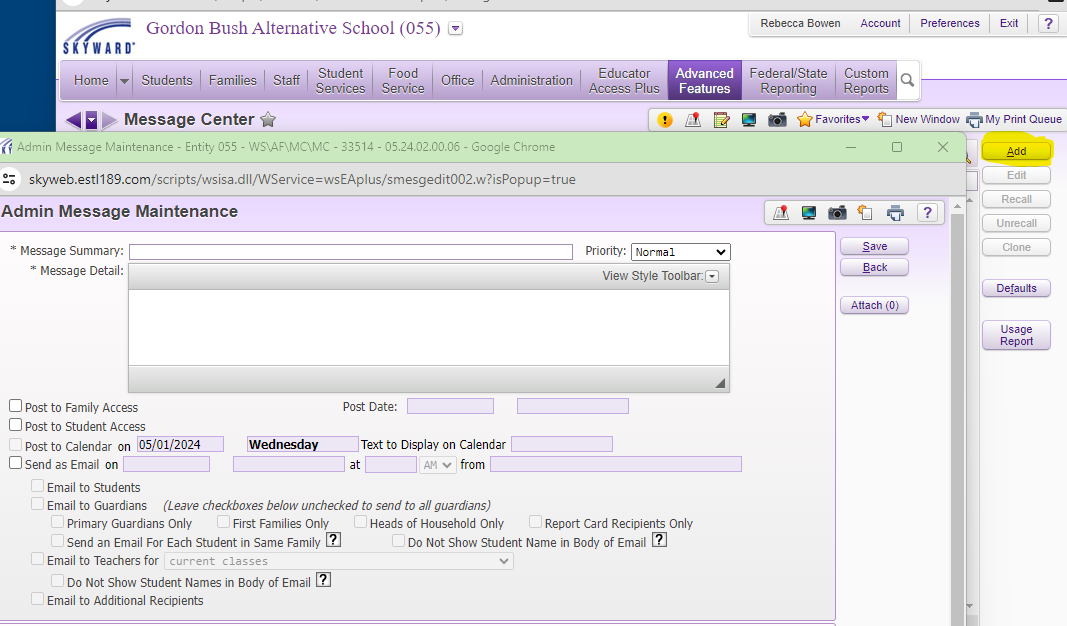
Once in the Message Center, select the ADD button to the right of your screen to create a new communication.
Once you get to this point, you can write out the details of your communication and set the priority for the message. You will have the option to post the communication to Family/ Student access, as well as sending the communication via email.
Tutorial Header: Options for Recipients, Tutorial Image: , Tutorial Content:
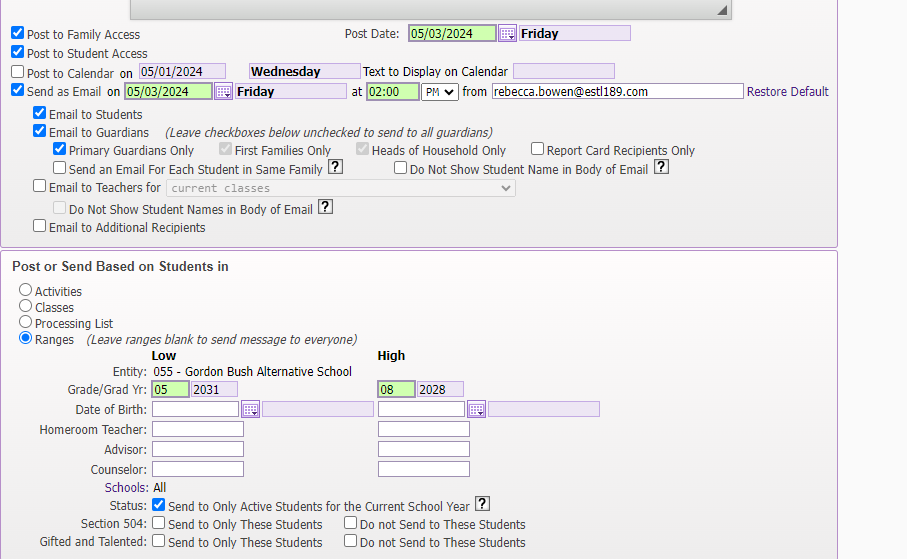
You will have a number of options for your communication, including limiting it to students in specific grade levels or courses, as well as identifying if it will post to the Family/ Student accounts in Skyward.
You can also create a communication to be sent in the future for a specific day and time.
NOTE: if there are multiple students from the same family, only one email would be sent. If you want a separate email for each student in the family, you should select the box indicating this.
The image above is set up to limit the communication to active middle school students only for a date in the future.
Tutorial Header: Sending Your Communication, Tutorial Content:
Once you have completed the message with the intended recipients and desired date/ time, click the SAVE button to the right of the screen and the communication will be processed as designated.
If you are not scheduling the message for the future, once you hit the SAVE button, the email will go out to all students/ guardians and/ or post to Family/ Student Access.
The Skyward Message Center provides users with the option to communicate to students and families through email and/or Family/ Student Access. This tutorial will take you through the steps on the Student Management side of the system.
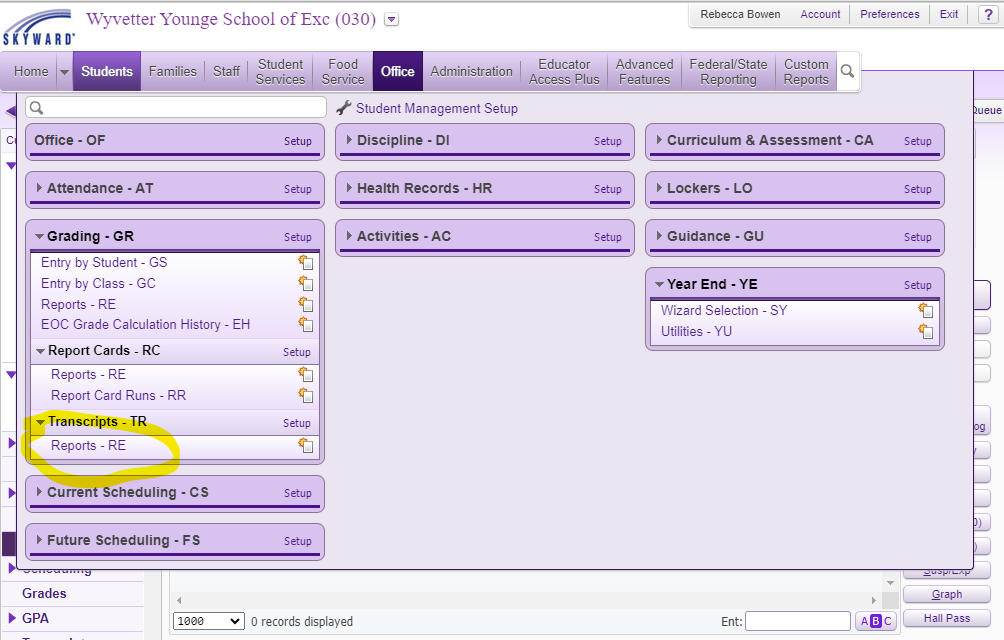
To create transcript labels, you will be on the Student Management side of Skyward. Navigate to OFFICE, and then under the GRADING tab, go to TRANSCRIPTS and select the REPORTS option.
Tutorial Header: Create or Edit Your Template, Tutorial Image: , Tutorial Content:
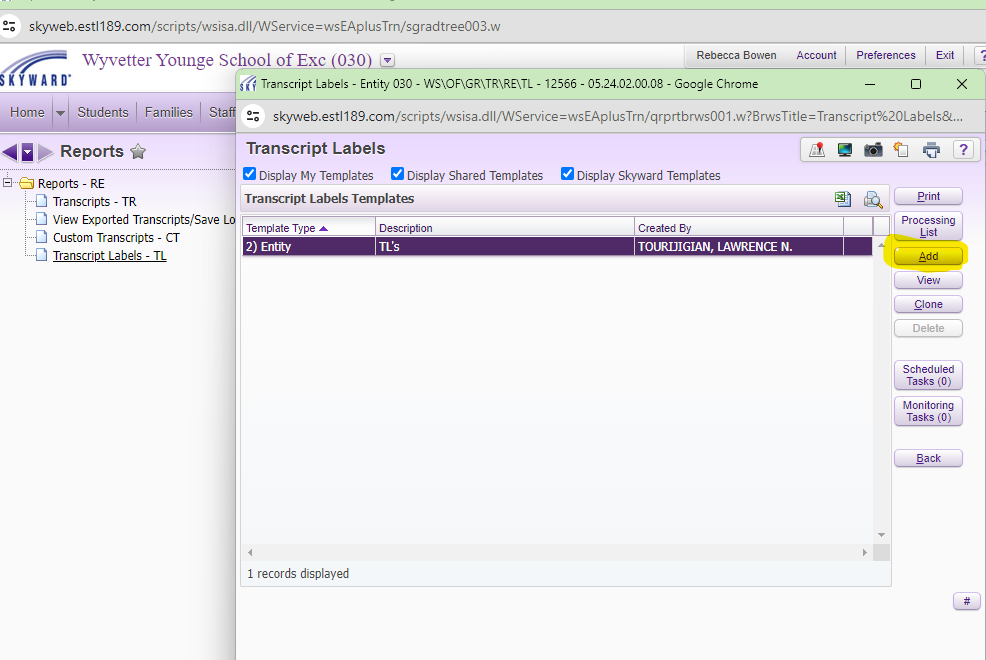
Once in the REPORTS section under transcript, you will select the TRANSCRIPTS LABELS report and you are ready to create your label!
If you've already created a template, you may highlight it and select the EDIT button to the right.
If you need to create a new template, select the ADD button. From here you will set up the labels.
Tutorial Header: Setting Up the Template - PART 1, Tutorial Image: , Tutorial Content:
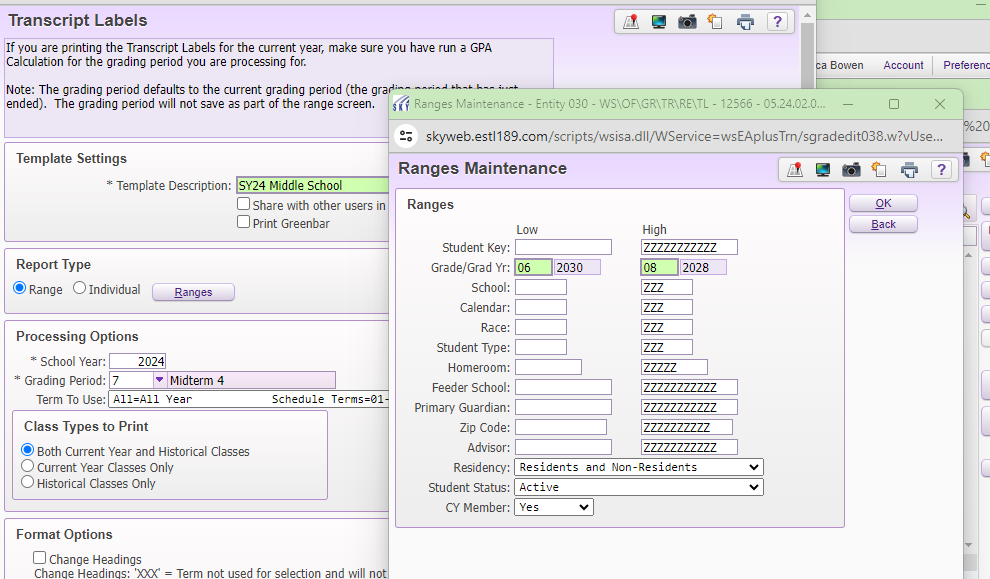
You will give your template a name as needed.
Set the RANGES button to pull for the desired grade levels. Change the Student Status option to ACTIVE and CY Member option to YES if you are only printing for your current students.
Tutorial Header: Setting Up the Template - PART 2, Tutorial Image: , Tutorial Content:
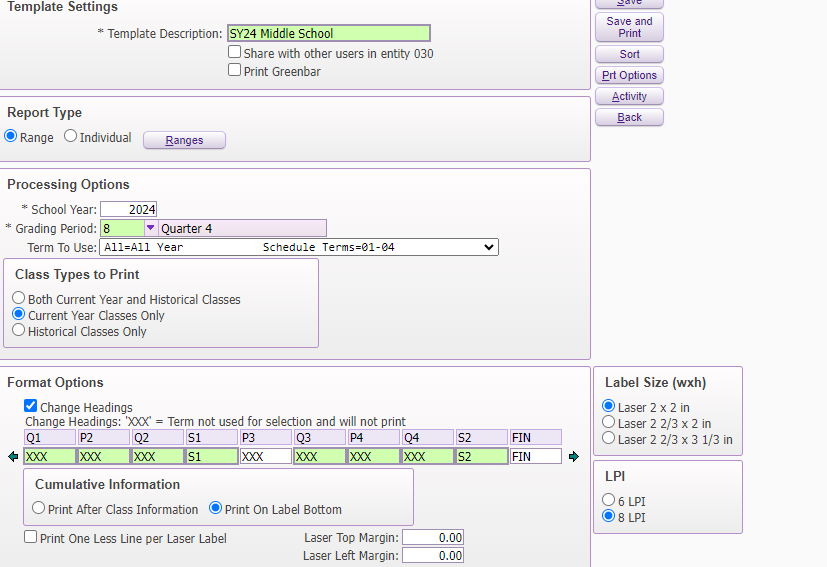
Because you are printing these each year, you want to select the CURRENT YEAR CLASSES ONLY. And because you are doing this for the end of the year, select the grading period to be Quarter 4.
The FORMAT OPTIONS will allow you to select the terms to print. Click the box that says CHANGE HEADINGS so that you can make your selections. Underneath anything with a P or Q, change to XXX so that it does not print. Use the green arrow ➡️to get to the fields with the FINAL grade option.
Tutorial Header: Adding Attendance to the Labels, Tutorial Image: , Tutorial Content:
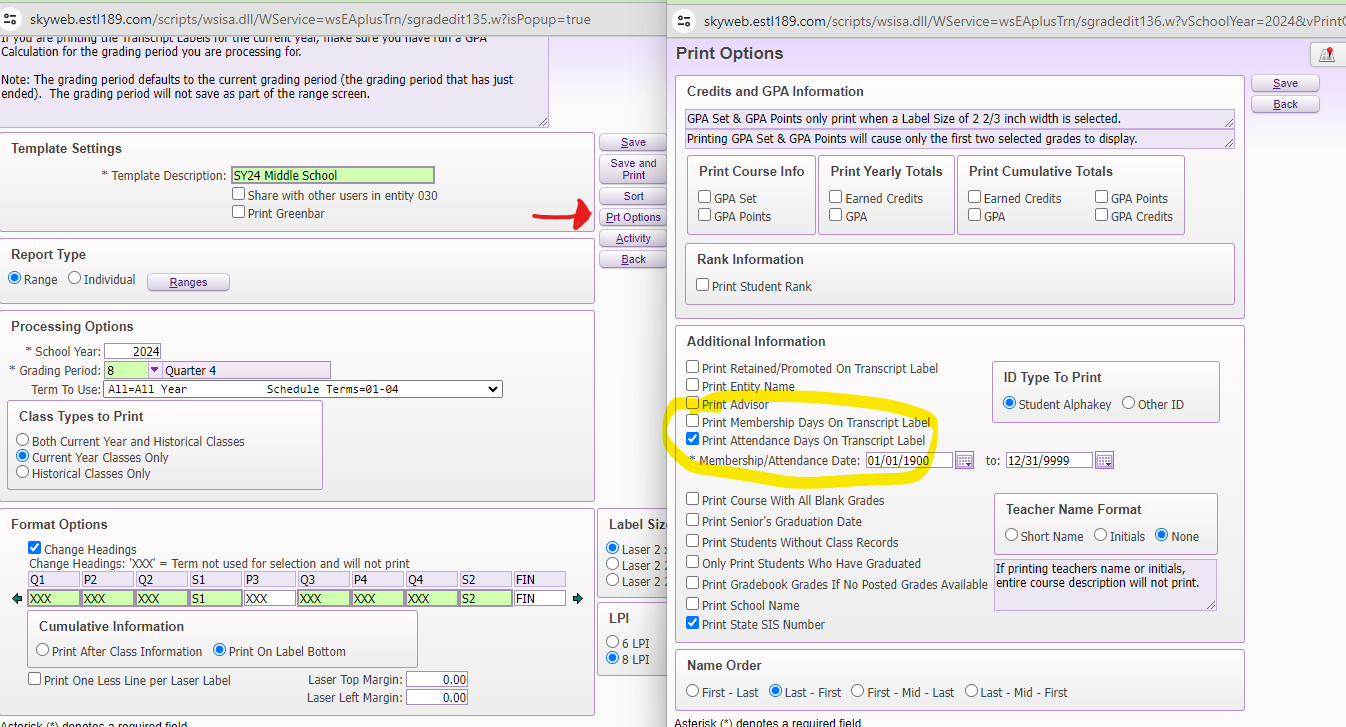
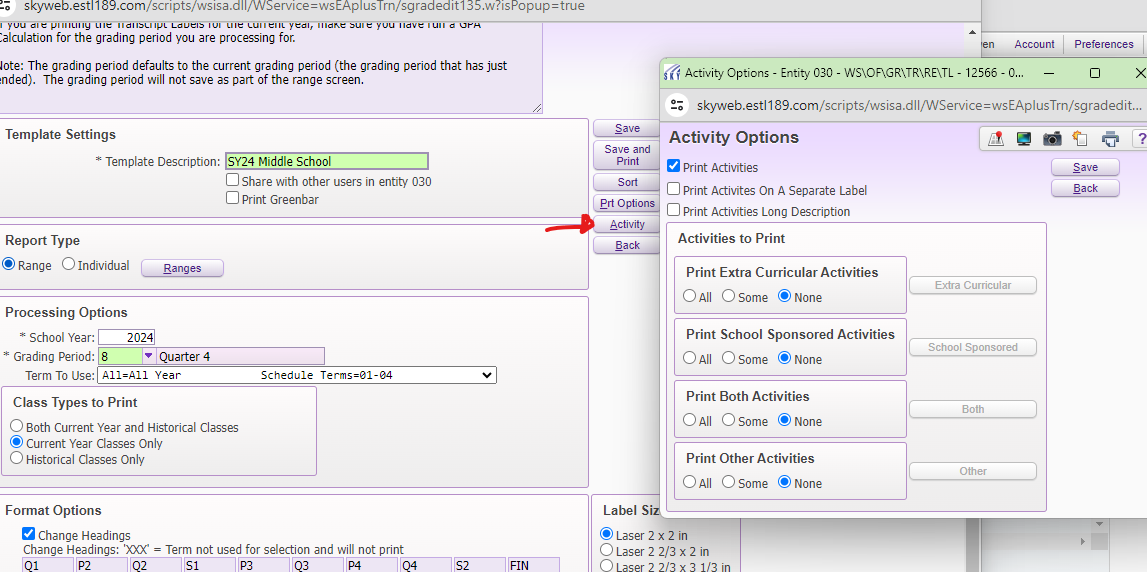
The F1 Cards require yearly attendance counts. You will add this by selecting the PRT OPTIONS button to the right. A new window will pop up.
In this window, select the box to "Print Attendance Days on Transcript Label".
This area will also allow you to select how you want the students' names to print and the add the State SIS Number.
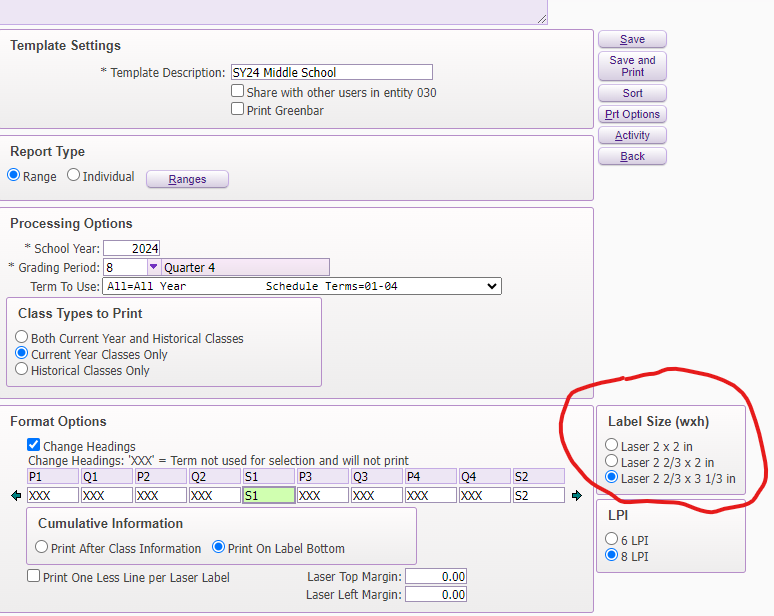
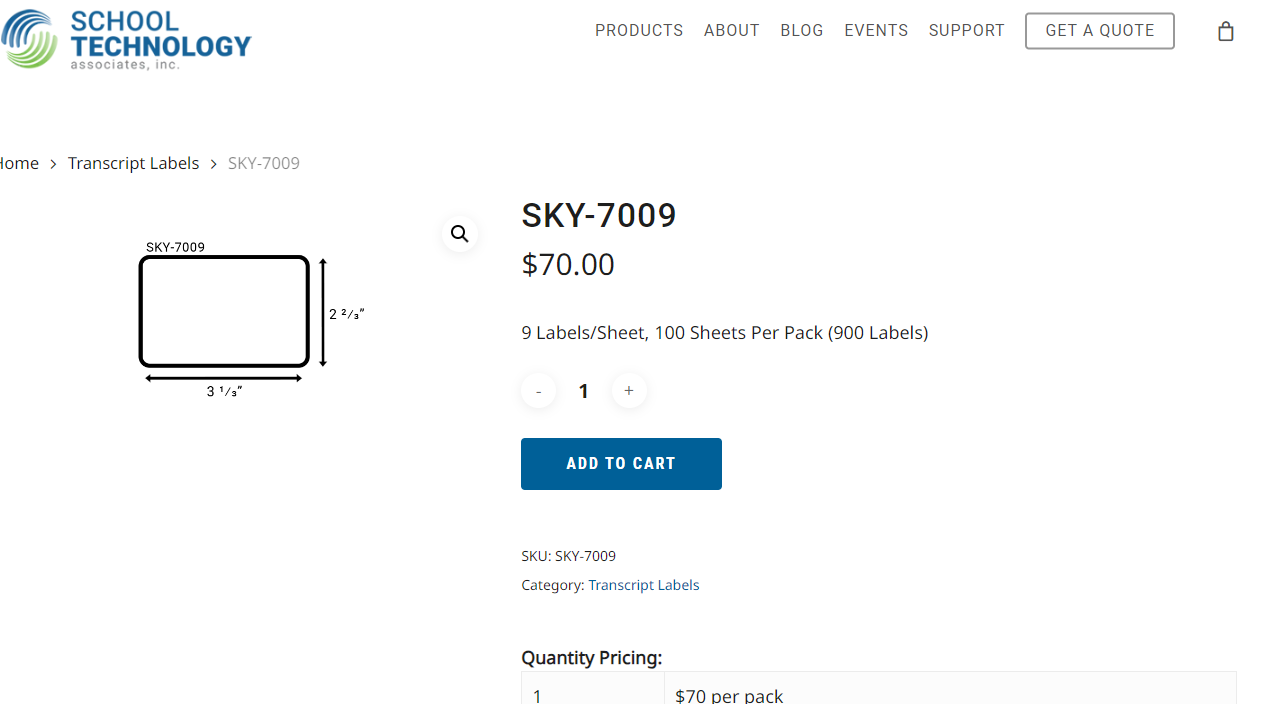
The district has been using a label (SKY-7009) that is 2 2/3 inches by 3 1/3. Be sure the label size matches this in the bottom right-hand corner before you SAVE & PRINT.
Tutorial Header: Ordering More Labels, Tutorial Image: , Tutorial Content:
If you need additional transcript labels, they are available through School Technology Associates, Inc. A box of 900 labels costs $70.
A link is provided for ordering. As with all purchases, an approved purchase order must be available in eFinance prior to ordering.
, Tutorial Link URL: https://k12sta.com/product/sky-7009/, Tutorial Link Title: ORDER TRANSCRIPT LABELS HERE
The F1 card that is a part of each student's permanent folder contains the grades earned for all subjects and attendance data, separated out by school year.
Beginning in 6th Grade, transcript labels can be printed and affixed in the F1 card with all required information.
Tutorial Header: 1. LOCATE STUDENT PROFILE IN CURRENT SCHOOL, Tutorial Content:
Start in the desired entity that should be the default and use the first 5 letters of the student's last name and then first 3 letters of the student's first name to find the student.
If you are unable to locate the student, check the ENTRY/ WITHDRAWAL records in the district entity 000. A student must have an open entry record in the desired school before it can be set as the default school.
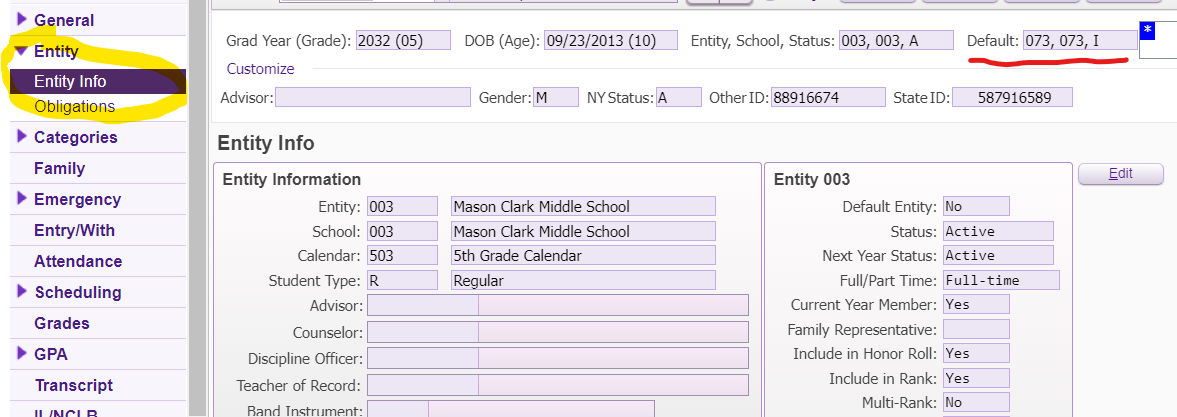
To the left, select the ENTITY INFO option underneath the ENTITY record on the student's profile page.
For the picture shown, the student now has an active entry record at MCMS (003) but still has Wright Elementary (073) as the default. This will need to be updated so that MCMS (003) is the default entity.
Tutorial Header: 3. EDIT ENTITY TO BE THE DEFAULT, Tutorial Image: , Tutorial Content:
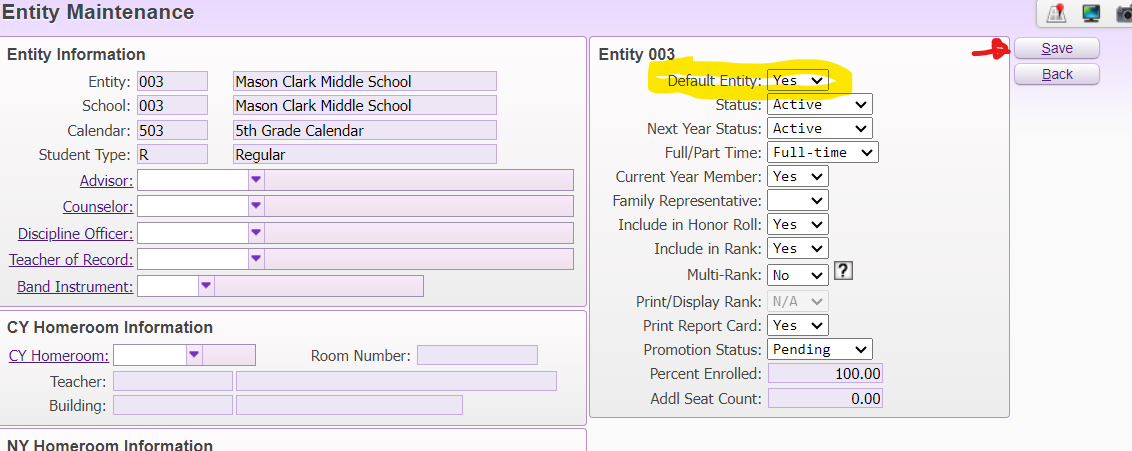
Once in the Entity Info section of the student's profile, select the EDIT button to the right to update.
In this area, you will choose the dropdown button and change the DEFAULT ENTITY field to "Yes".
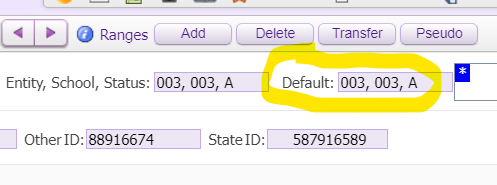
After saving the updated default entity, it is recommended that you confirm that the student's profile is now showing the same entities.
Review of this student's record now shows that 003 is the default entity and matches the current entity.
As a student moves between schools, it may be possible that the DEFAULT entity does not match the active enrollment for the current school.
The process to update this can be done under a student's profile on the Student Management side of Skyward.
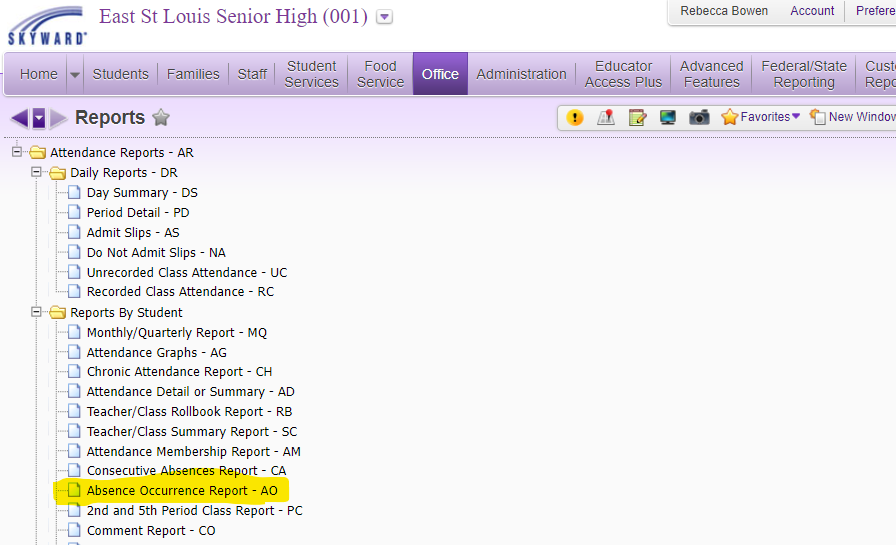
To access this report in Skyward, you must be in your specific entity (not 000). Once you are there, travel to Office -> Attendance -> Reports -> Absence Occurrence Report AO.
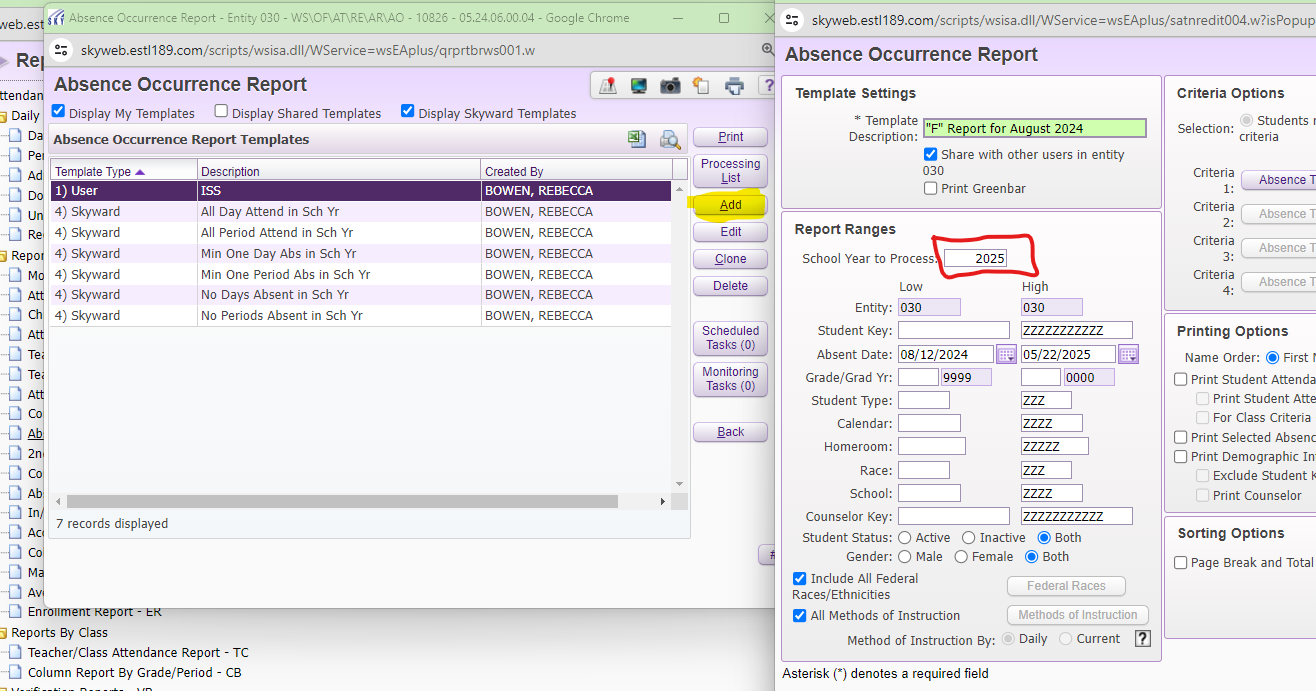
Once you get into the Absence Occurrence Report area, you will create a new template or edit your existing template. If assistance is needed, you can also request support from the district office to get a report set up for you and then clone it.
To create a new report, select the ADD button to the right, give your template a name, and confirm it is for the current school year.
The default will be for dates for the entire school year. When running this report at the start of the school year, this will be changed to one single day.
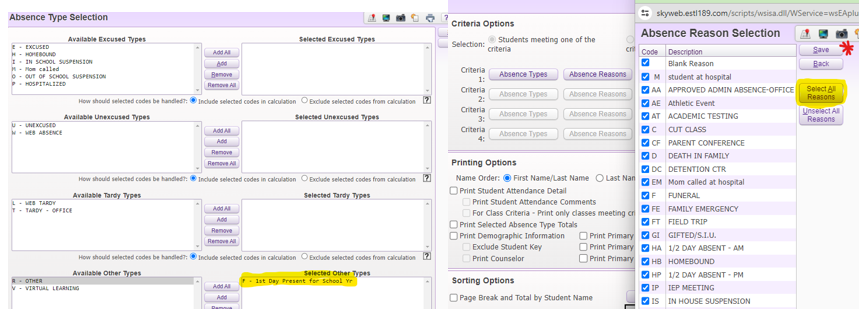
The first thing to do to set up your report is to define the Absence Type and Absence Reasons that will be used. Since this report is looking for any students marked with an "F" for First Day, the Criteria Options will be very limited.
For Absence Types, the one selection will be the F - 1st Day Present for School Yr option. Highlight that at the bottom and click the ADD button. Be sure to hit SAVE.
Teachers cannot input absences reasons but other staff members with access may have updated a student's record. To be certain all possibilities are available, click on the Absence Reasons button, SELECT ALL REASONS, and then SAVE.
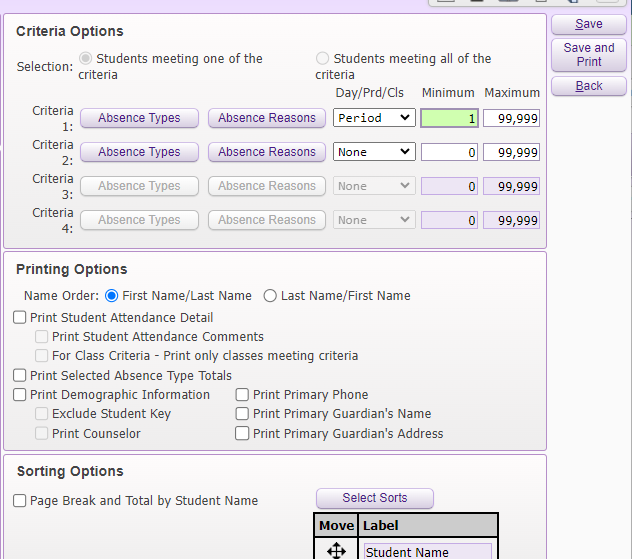
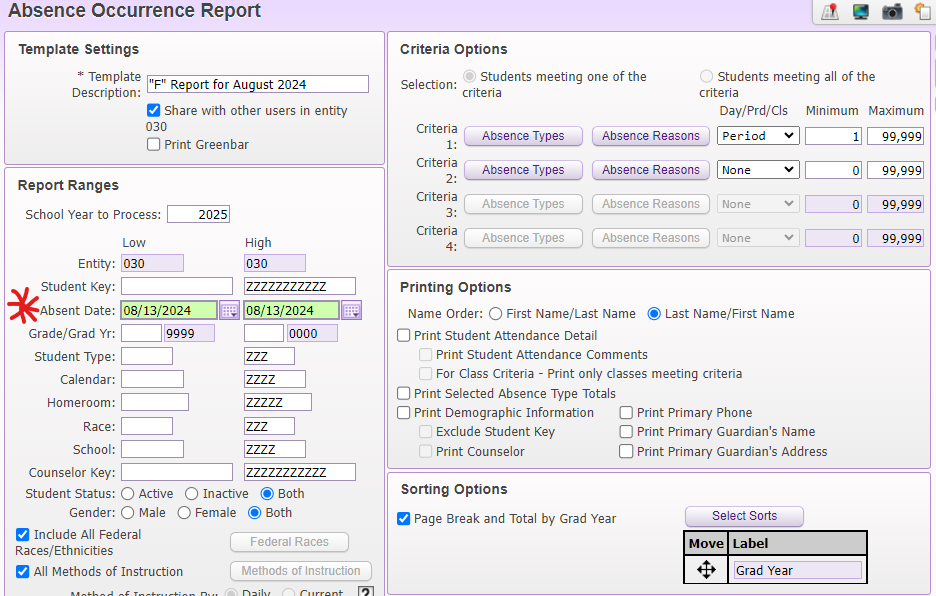
Because you are only looking for students marked with an "F" for a specific day, change the Minimum field to a "1". This will ensure only students marked with an "F" in one of their periods is shown on the report.
The picture here shows that we are looking at each student by period and pulling the names of all those students marked with an "F for a specific date.
The default for this report will be to sort printed students by name. You can select how you want names to print with either the first name or last name listed first.
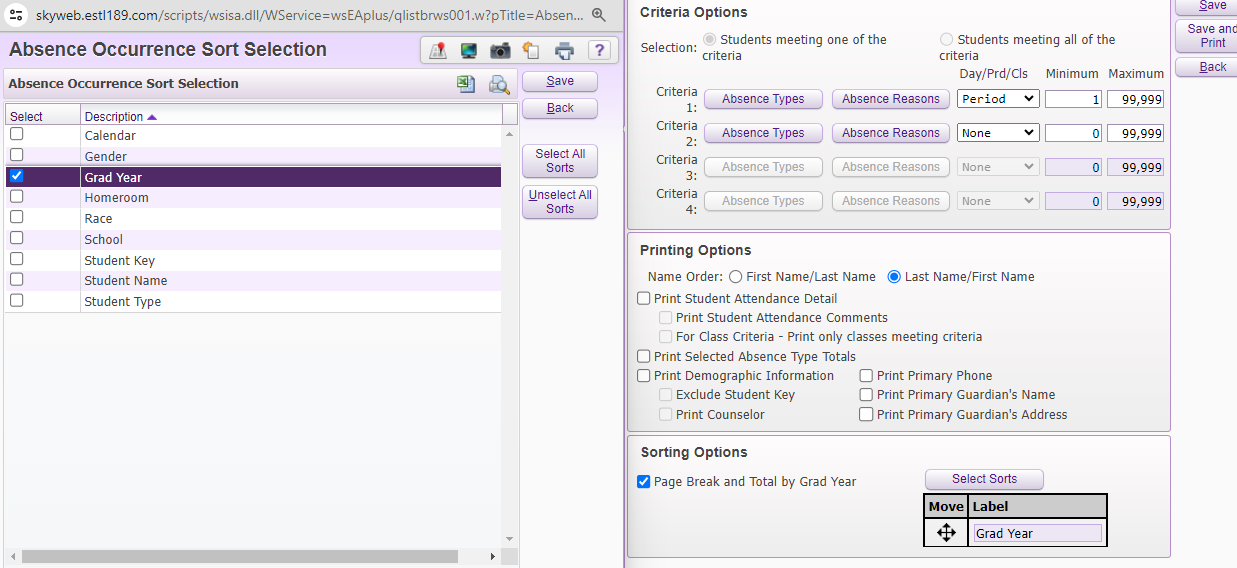
If you wish to sort students for your report by some other criteria, choose the Select Sorts button at the bottom and choose how to sort students.
In the picture, students will be printed based on Graduation Year. The box is also checked to give a page break and a total for all students marked for that day for each Grad Year.
Tutorial Header: Editing Your Report for a Specific Day, Tutorial Image: , Tutorial Content:
The "F" Report should be run daily at the start of the school year to identify which students have shown up. The date you are looking at can be changed by selecting your template from the list and then select the EDIT button to the right.
In the picture, the report will print any students who were marked with a "F" for Tuesday, August 13, 2024 only.
Staff can then adjust the entry dates for these students at the end of the day in the ENTRY/ WITHDRAWAL tab of the student's profile pages.
Tutorial Header: BEST PRACTICES FOR ATTENDANCE, Tutorial Image: , Tutorial Content:
Teachers should take attendance on every child that is scheduled into the gradebook.
If a student does not appear in the gradebook, they are not scheduled in the class and should report to the appropriate teacher.
If a student is scheduled in the class but is not there, the student should be marked absent, regardless of whether to student has reported to school for the first time or not.
Teachers should mark an "F" the first time a student reports to the class.
During the start of the school year, staff will be working to determine which students have reported for their first day and when that first day was. You can use an ABSENCE OCCURRENCE REPORT set up for the code "F" in Skyward.
This article will take you through the steps of setting up and...
Tutorial Header: Setting Up the CCR Program in Skyward, Tutorial Image: , Tutorial Content:
The CCR Special Program will be created for all high school students at the district level.
For those Skyward users with appropriate access, this will be done on the STUDENT MANAGEMENT side of Skyward by following this path:
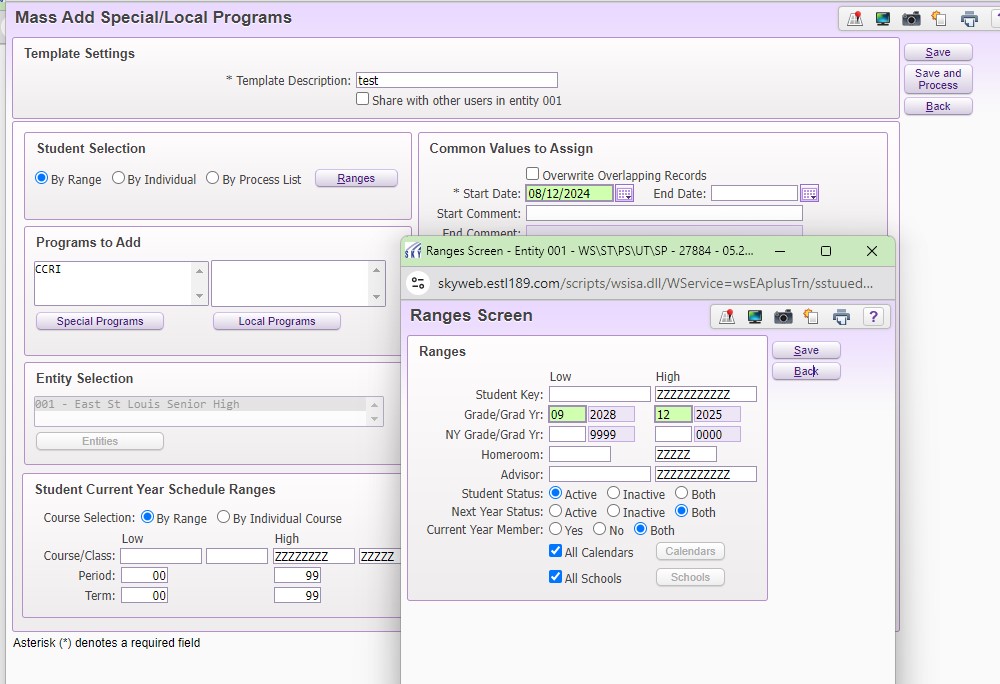
Students -> Utilities -> Mass Add Special/ Local Programs
Once in this screen, select the grade level ranges or individual students you wish to add records to, and then insert the appropriate start date. From the options of SPECIAL PROGRAMS, select the CCRI field. Always select the SAVE/ SAVE & PROCESS button(s) after making any updates.
Tutorial Header: College & Career Readiness TRACKER, Tutorial Image: , Tutorial Content:
East St. Louis District 189 uses Skyward for all student information that is a part of state and federal reporting. East St. Louis Senior High and Gordon Bush Alternative will also implement SchooLinks for staff and students as part of their process.
Some metrics will be collected strictly in Skyward and some will be developed in SchooLinks as students are completing tasks. Any of the available SchooLinks metrics will be extracted and imported into Skyward.
The CCR Data Collection tracker spells out the various items that will be tracked in the different systems.
, Tutorial Link URL: https://docs.google.com/spreadsheets/d/1tJqz-gUuevgVCC8o8ekE0bD-DsIRHfENU1fzrHrEMFM/edit?usp=sharing, Tutorial Link Title: SY25 COLLEGE & CAREER READINESS Data Collection TRACKER
Tutorial Header: Available Skyward Entries, Tutorial Image: , Tutorial Content:
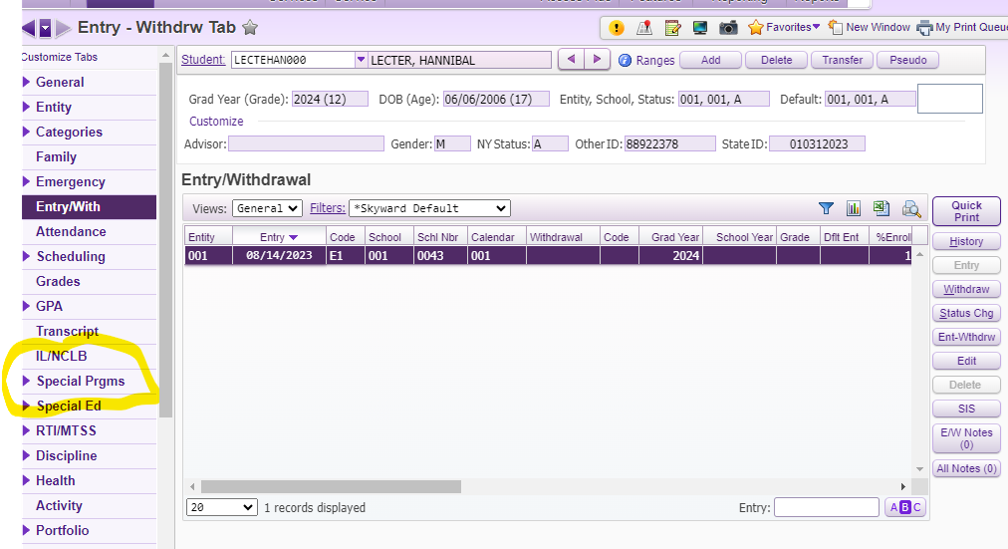
The CCR Data Collection is available in Skyward under SPECIAL PROGRAMS on the Student Management side of the platform.
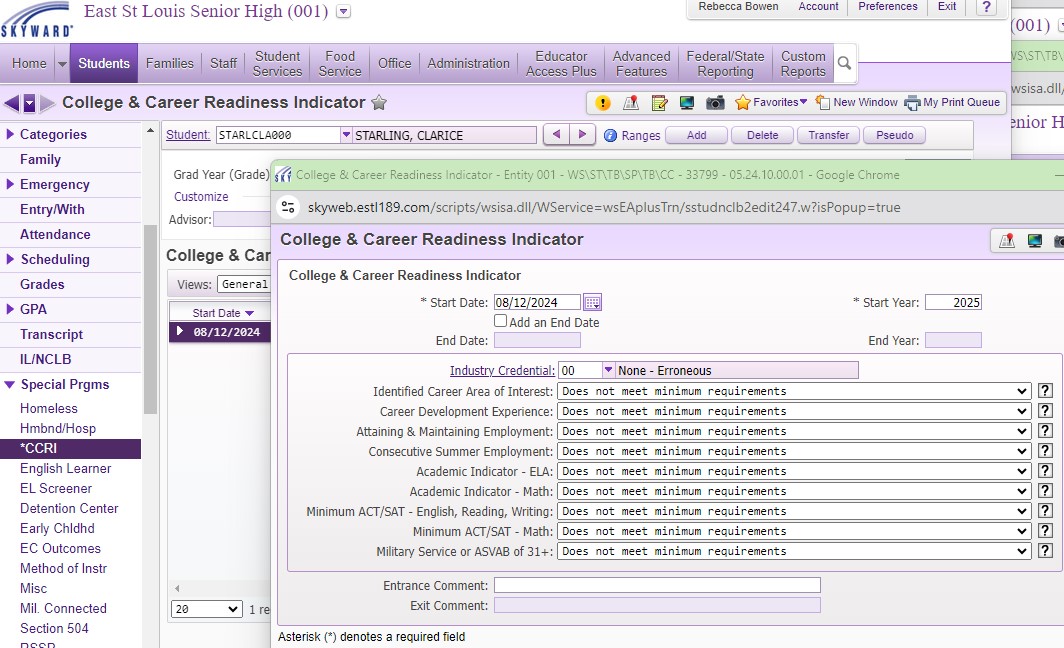
Once a program record is created for a student, all metrics will default to DOES NOT MEET MINIMUM REQUIREMENTS until specific metrics are updated for a student. The screenshot presented shows the available metrics in Skyward that the CCR Team will update.
The attendance and GPA metrics that are a part of the data collection will automatically be available through other ongoing updates and entries to each student's record and do not have to be updated here.
Tutorial Header: Updating Individual Entries for a Student, Tutorial Image: , Tutorial Content:
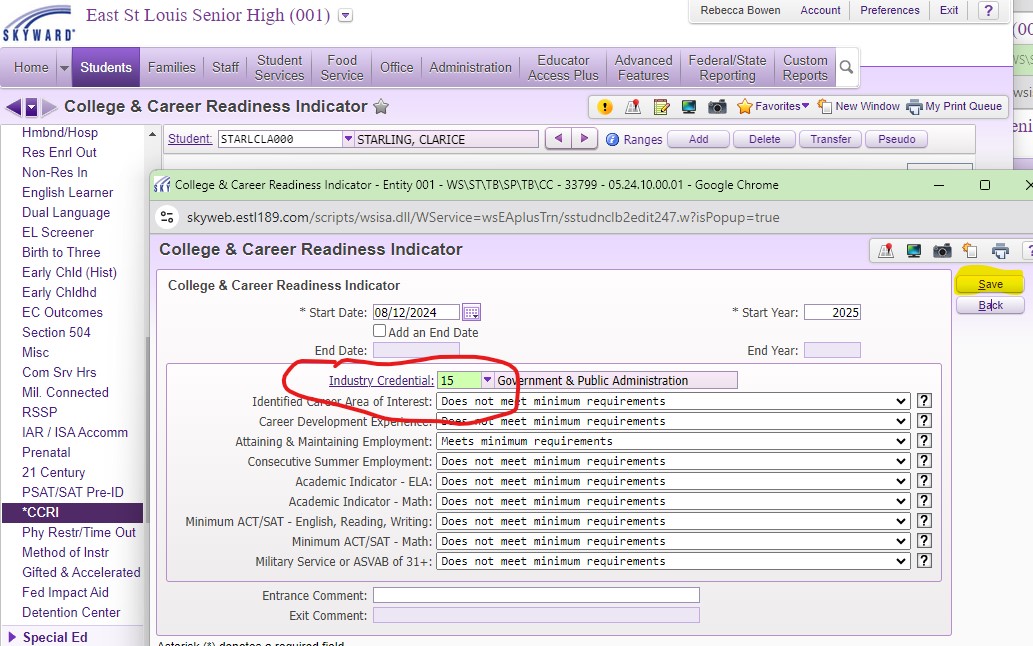
To update CCR entries for an individual student, go to the student's profile and select the *CCRI option under SPECIAL PROGRAMS. Highlight the desired school year record and select EDIT to pull up the options.
In this screen you can update specific metrics for the student and then select SAVE.
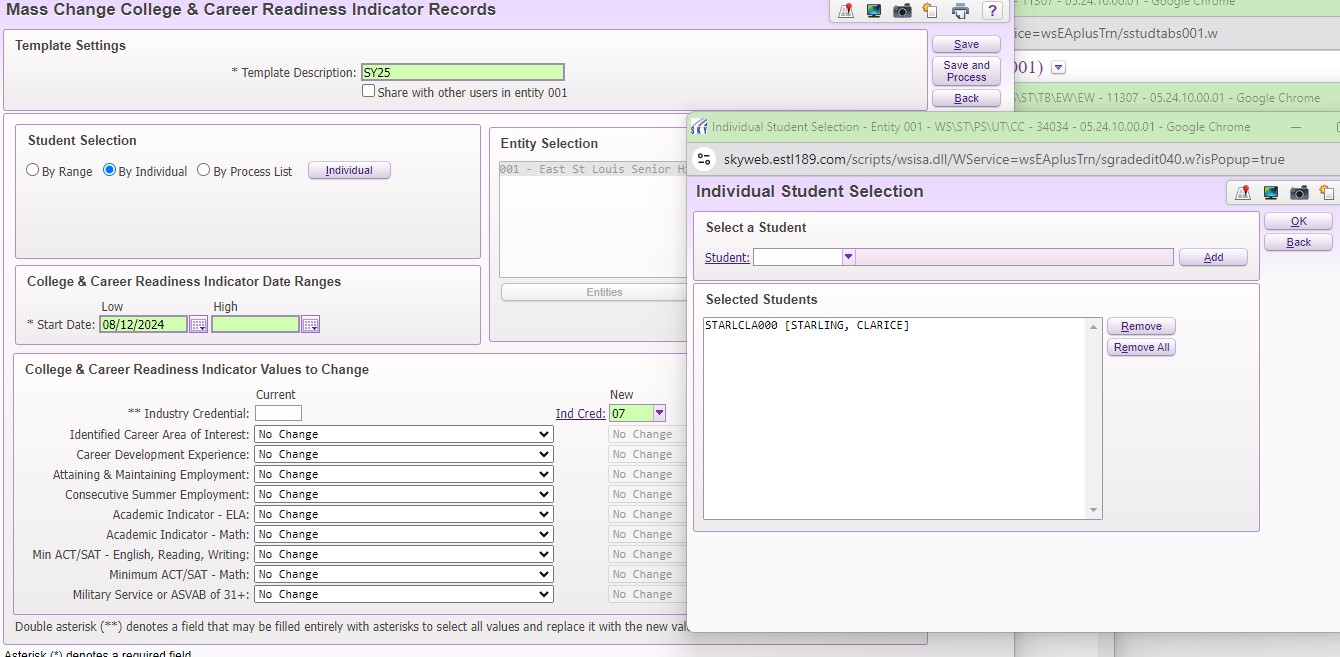
To update a specific metric for multiple students, the most efficient option will be to run a utility. This utility is accessed with the following path:
Students -> Setup -> Utilities -> Mass Change CCRI Records
Here, you will either create a new template or select and edit an existing template. Under STUDENT SELECTION, select the BY INDIVIDUAL OPTION and then select the names of the students you will be updating.
Once you have selected all the students, choose the field(s) that will be updated - whatever the current value is will be changed to the selected new value - and then hit SAVE & PROCESS.
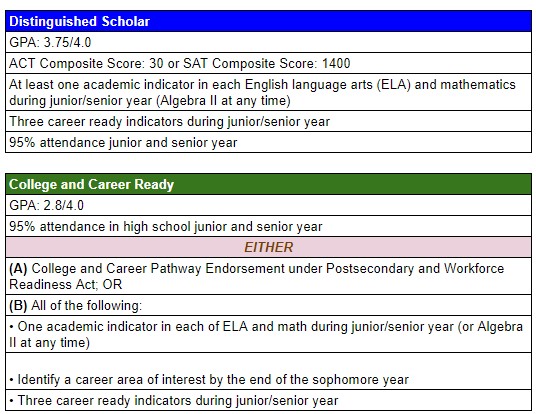
Beginning with the 2024-25 school year (SY25), the state of Illinois will include the College & Career Readiness (CCR) metric as part of the calculations for every high school's Illinois School Report Card. This metric will account for 2.5% of the score for determining a school's summative...
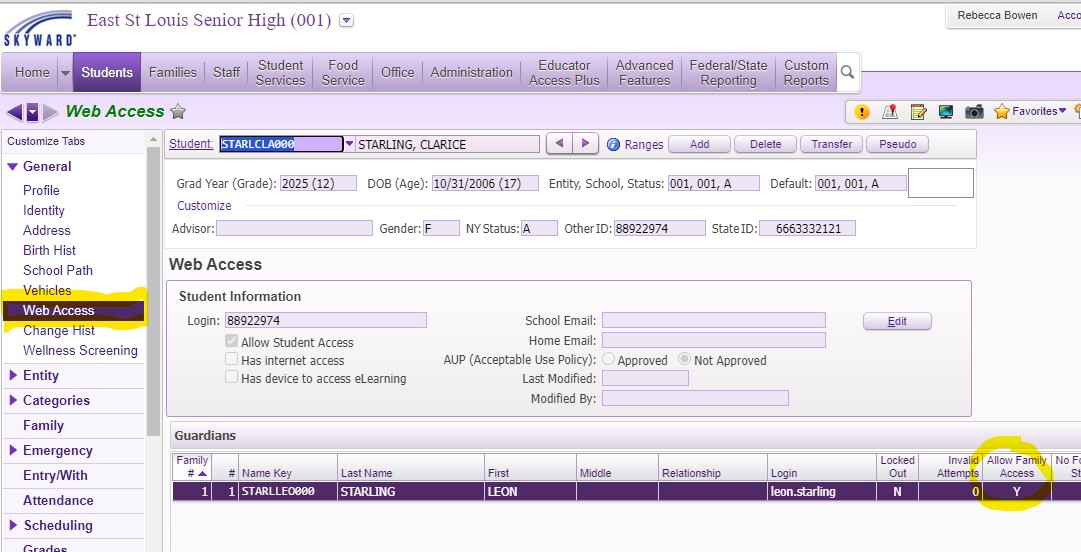
To review the status of the user's account, you should be on the STUDENT MANAGEMENT side of Skyward. You will go the the Profile for the student in question.
Once in a student's profile, you will be looking for the WEB ACCESS tab under the GENERAL tab of the profile. When you click on that tab, it will list out the family members who have been granted Family Access.
Tutorial Header: Is a Password Reset Needed?, Tutorial Image: , Tutorial Content:
Once you have identified that a parent is listed with Family Access, you will need to determine if they need the initial password or if a password reset is required.
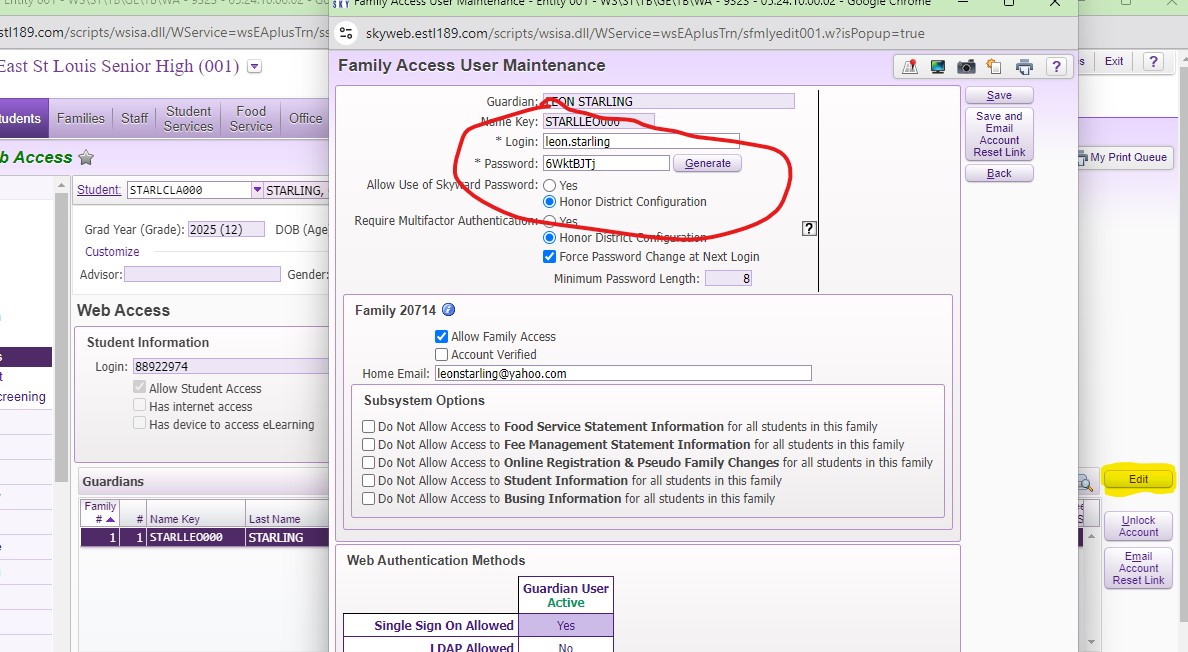
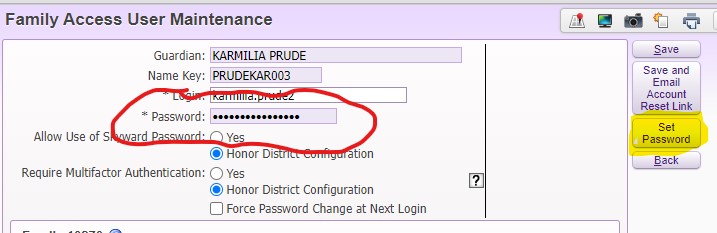
To check if they have ever used the initial password, click the EDIT button to the right of the Guardians listed under Web Access. When this opens up, you will see the login name that must be used and a field with the password.
If you can see the password, that means the person has never logged in. You can simply provide this to the person and let them know that a new password will have to be created. You will not need to save anything; simply press the BACK button and return to the previous screen.
Tutorial Header: New Password Needed, Tutorial Image: , Tutorial Content:
If you get the the guardian's account after selecting the EDIT option and see a series of asterisks (****************), this means the guardian has already logged in and will need a new password.
The typical reason why this is needed is that a person has forgotten the password.
Tutorial Header: WARNING: Do Not Use Email Account Reset Link, Tutorial Image: , Tutorial Content:
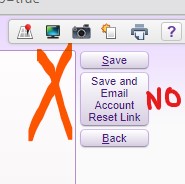
There is a button to the right that says SAVE AND EMAIL ACCOUNT RESET LINK that appears to be a way to get a guardian access to their account. This will not work and should not be used.
Tutorial Header: Setting New Password, Tutorial Image: , Tutorial Content:
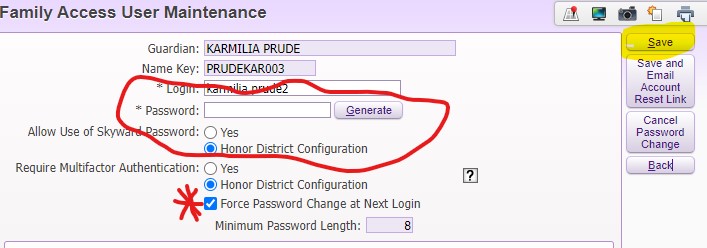
In the EDIT screen for the guardian's account, select the button to the right that says SET PASSWORD. Once you do this, the password box will be blank and ready for you to input a new value.
Create a simple, easy password that is 8 characters long and give this to the guardian. You will also click the box next to FORCE PASSWORD CHANGE AT NEXT LOGIN so that the person can create their own new password.
Once you have typed in the password and clicked the box to force them to change it after logging in, simply hit the SAVE button and the account is ready to go!
Parents and Legal Guardians can access Skyward to review their student's attendance, grades, and more. The purpose of this article is to review the steps to update an account to ensure access to the system.
Prior to providing any information for accessing the account, please ensure an ID is...
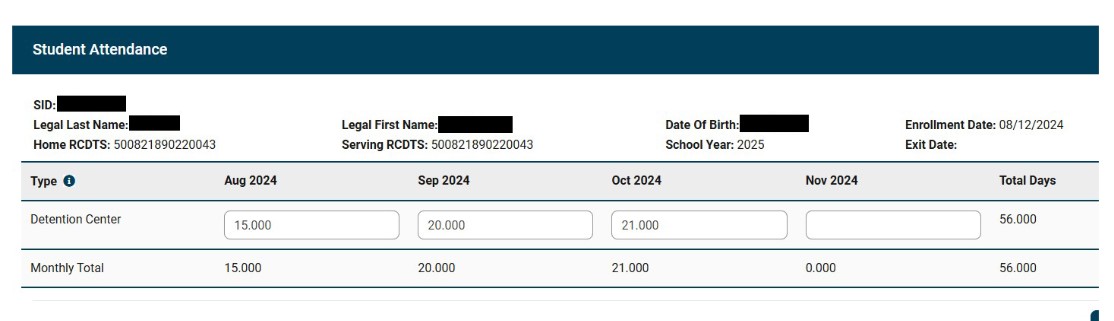
By entering the detention center record, the student's attendance data will report as 09 DETENTION CENTER when uploaded to SIS.
The detention center record will override any absences input by staff members.
The sample SIS record shown represents the attendance for a student detained at a detention center from August 12, 2024, through October 31, 2024. The home school receives credit for this attendance.
The purpose of this article is to show the needed data entries for state reporting of attendance for students detained in a detention center.
The school district with the detention center will be responsible for reporting the student's stay in the facility, but the home school district will have...
Confirm you are trying to log in using the correct username and password.
Your username and password are the same as your computer login information, not your email account.
Tutorial Header: Confirm Your Account is Not Due for a Password Reset., Tutorial Content:
This needs to be done from a District PC on the District Network. This cannot be done from a Chromebook, a non-district computer, or while outside of the buildings.
Completely reboot the device if you are currently logged in.
At the windows login screen, enter your account information as normal. You will be prompted to set a new password if you are due for a reset. If you did have to reset your password, now that new password is the one you will use to log into Skyward.
Tutorial Header: New Staff Members, Tutorial Content:
If you are a new staff member, verify with your Department Head or Principal that a Skyward Access form has been submitted for access on your behalf. If you have not filled out a Skyward Request Form, you will have to complete this process before gaining access to the system.
Are you trying to log into Skyward but get an error message that your password is wrong?
THE MOST LIKELY CAUSE OF ISSUES RELATED TO LOGGING INTO SKYWARD ARE BECAUSE IT IS TIME TO RESET YOUR PASSWORD FOR LOGGING INTO A DISTRICT COMPUTER. THIS HAS TO BE DONE ON A DISTRICT COMPUTER THAT IS...
Tutorial Header: FIRST DAY Report, Tutorial Content:
The "F" for FIRST DAY report will identify students who have been marked for their first day of attendance for the new school year.
Each school has a report set up to track the counts of students marked for their first day.
To find your report, go to:
Office → Attendance → Reports →
Absence Occurrence Report AO → “F” for FIRST DAY
This report will track students marked for their first day from 8/11/2025 through 8/22/2025 & give a total for each grade level.
Highlight the name of the report and click the PRINT button.
This report will list the students and the day they are marked with the “F”, the first day of attendance. You would adjust the entry date for any student who was not marked for the first day of school.
Each day that you run the report, the TOTAL will update for each grade level.
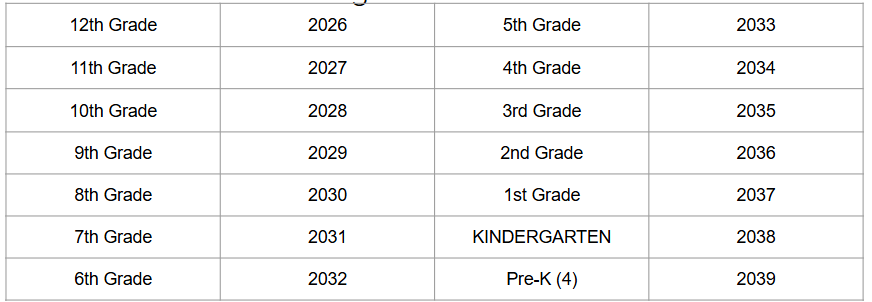
The Grad Years for each grade level are:
Tutorial Header: DAY SUMMARY, Tutorial Content:
This building-level report captures all attendance entries on a given day for all students in a given range (ie, a particular grade level).
To get to this report, go to Office → Attendance → Reports → Day Summary DS
, Tutorial Link URL: https://support.skyward.com/DeptDocs/Corporate/Documentation/Public%20Website/Tutorials/Software/WS_OF_AT_RE_AR_DR_DS_1801591_100_T.pdf, Tutorial Link Title: Details for Setting Up the DAY SUMMARY Report
This report is run under a specific student’s profile by navigating to the ATTENDANCE tab on their profile. You can print a detailed summary for a specific date range or the day summary for the student.
This report is helpful for providing documentation to the ROE for Chronic Truancy referrals as it can provide the detailed attendance data needed to support the referral.
Tutorial Header: ATTENDANCE DETAIL or SUMMARY, Tutorial Content:
This report can be set up to capture days missed or periods missed and can be run for individual students or a range of students.
Once you set up your specific report, you can run it from an individual student’s profile (QUICK PRINT) or from the Office/Attendance/Reports area.
, Tutorial Link URL: https://support.skyward.com/DeptDocs/Corporate/Documentation/Public%20Website/Tutorials/Software/WS_OF_AT_RE_AR_AD_929635_100_T.pdf, Tutorial Link Title: Details for Setting Up the ATTENDANCE DETAIL or SUMMARY Report
Tutorial Header: AVERAGE DAILY ATTENDANCE, Tutorial Content:
The Average Daily Attendance report is a very robust report that takes more time to set up, but once it is created, this report can give student level details such as:
Days Possible
Days Absent
Days Present
Days Unexcused
Days Excused
If the report is run for a date range of more than 10 days, the report will also list out students who are CHRONIC TRUANTS (unexcused absences for 5% or more of their possible days) and/ or CHRONIC ABSENTEES (absent for 10% or more of their possible days).
There is a separate article that covers the Average Daily Attendance report. See the link below to review that article.
*NOTE: The district office uses the Average Daily Attendance report to feed that dataset that is in the district's data dashboard.
, Tutorial Link URL: https://estl189.qbase-online.com/knowledge-base/21-skyward/53-average-daily-attendance, Tutorial Link Title: AVERAGE DAILY ATTENDANCE article
There are a variety of reports available in Skyward to review student attendance. It is possible to pull reports for a specific student, a range of students, or for the entire building. This article highlights recommended reports used from Skyward SMS 2.0 by the H.A.T. Officers in...
The gradebook tracker is a robust area that allows administrators to check on a variety of items such as student attendance for a particular class, family access, and the teacher's gradebook.
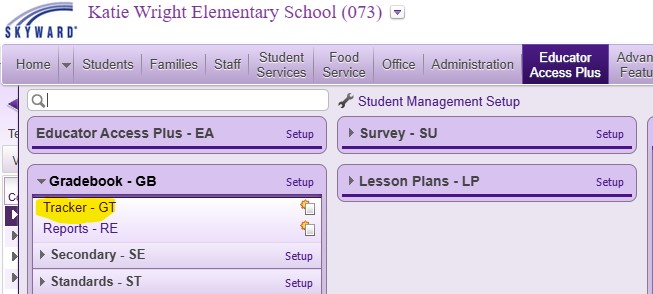
To access the GRADEBOOK TRACKER, follow this path:
EDUCATOR ACCESS PLUS→GRADEBOOK→TRACKER
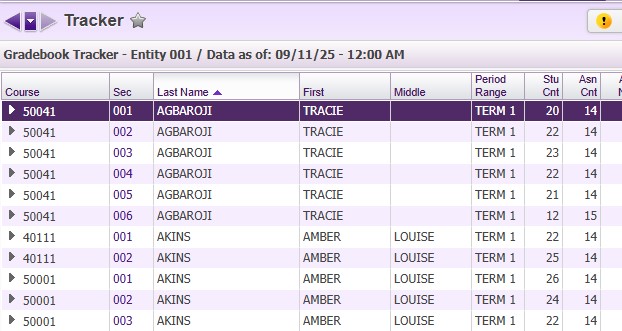
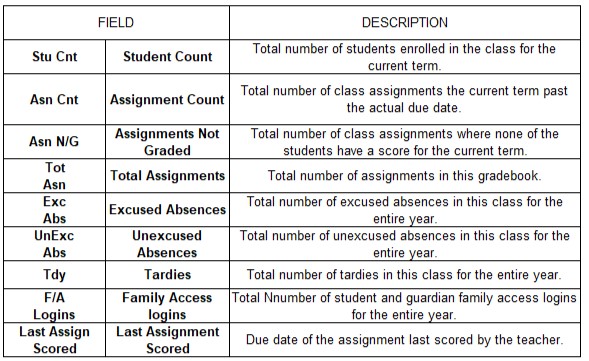
The information in the tracker is listed out by class/ section.
To put the report in alphabetical order by teacher last name, click the LAST NAME box once; click it twice to put it in reverse alphabetical order.
To put the report in order by the count of assignments, click ASN CNT once to show classes with the least to the most assignments; click the box a second time to put the classes in order from the most assignments to the least.
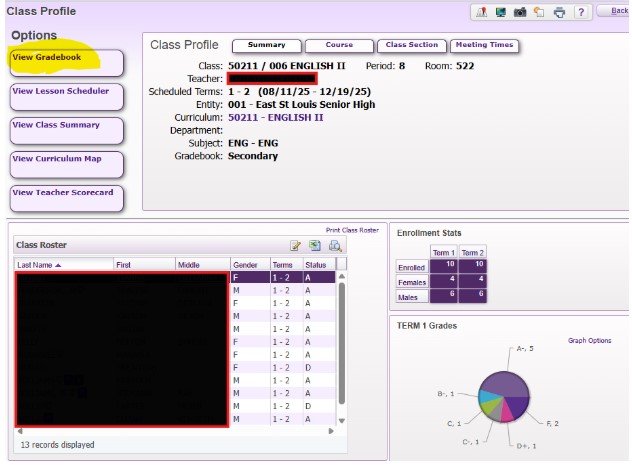
In the tracker, find the class and specific section you want to access and click on the section number (2nd column).
A class profile will open up that gives details about the class, including teacher name, period, and term. There is also a graph that shows the current grades in the class.
Click on the VIEW GRADEBOOK option to open up the gradebook and review its contents.
Tutorial Video URL: https://youtu.be/uTCKR6yzoSc?si=-ldYBPimqViiKXdi, Tutorial Link Title: TEACHER TRACKING VIDEO
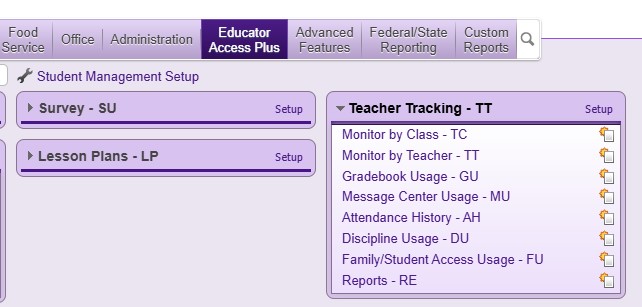
The teacher tracking area of Skyward is a way for administrators to view statistics on Gradebook Usage, as well as graph the information. There is also data on attendance, discipline, message center usage, and family/ student access.
This area allows adminstors to monitor with more visualizations than the tracker section.
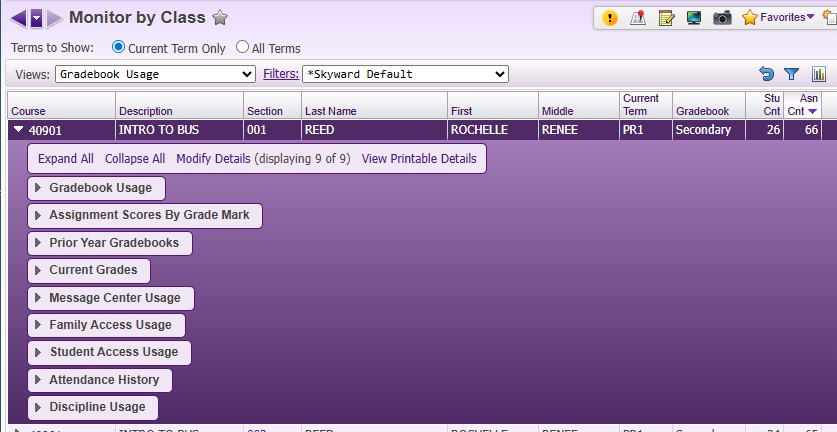
When MONITOR BY CLASS is selected, you will access a table that is similar to the TRACKER. You can sort the table as done in the tracker.
Find the class you wish to review and click the to access the information.
Here you will find a variety of gradebook statistics and attendance history for the class, as well as usage of the message center, family access, and student access.
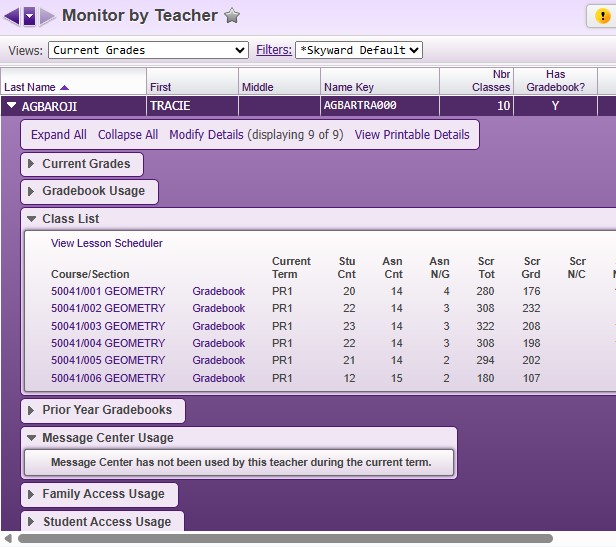
This area will allow you to access the data and statistics for all of a teacher's classes. The same information is available as the other areas for monitoring, but this will provide everything together for the teacher, instead of searching for a specific class/ section.
To access the gradebook for a teacher, open up the CLASS LIST field and simply click on the GRADEBOOK link.
The purpose of this article is to show options for administrators to monitor teacher gradebooks in Skyward SMS 2.0.
East St. Louis District 189 implemented Cisco Duo, a cloud-based multi-factor authentication (MFA) solution, in September 2025. This app strengthens account security for all staff for a variety of software access. You must have this app installed on your cell phone to access Skyward on your laptop.
NOTE: even with the Cisco Duo app, you will not be able to use a district Chromebook to access Skyward.
Your laptop will need to be connected to the district's VPN (virtual private network) in order to access Skyward. You will log into your district laptop using your credentials, ensuring that the device is connected to your home's WiFi connection. Your screen will be blank and you will get an error message; the screen will show only the RECYCLE BIN.
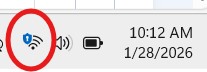
Navigate to the lower right-hand corner to access the WiFi settings on your laptop. Click on the WiFi option and locate the VPN option in the upper right-hand corner of the WiFi settings pop-up. When you get to this point, you will want to click CONNECT.
Tutorial Header: THREE: Confirm Connection through Cisco Duo app, Tutorial Image: , Tutorial Content:
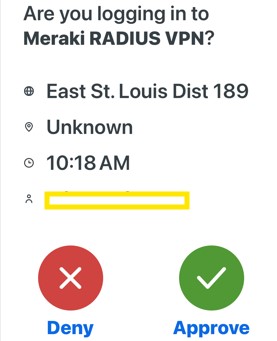
While you are completing the steps to access the VPN, you will need to have your phone nearby with the Cisco Duo app open. After a few moments of selecting CONNECT from the VPN area, your Cisco Duo app will ask you if you want to approve the connection. The picture shows what you will see; you must select APPROVE to connect to the VPN.
Once you select the APPROVE option, the VPN setting will change to CONNECTED.
If you have icons on your desktop that you use to access various platforms, you will need to wait up to 5 minutes for your desktop to load. From there, you can see the SKYWARD icon to access the system.
If you are having issues with your desktop icons loading, you also have the option to use MicroSoft Edge. If you click on the 4 blue squares to the left of your SEARCH bar on the bottom of your laptop, you will see the web browser MicroSoft Edge is pinned. You can open MicroSoft Edge, navigate to estl189.com, and then select the SKYWARD ACCESS icon.
From there, use your district credentials to log into Skyward to take attendance, utilize your electronic gradebooks, or run any needed reports.
The purpose of this article is to review the process for accessing Skyward from your district laptop while working from home on E-Learning Days.
NOTE: you may only access Skyward using a district-issued laptop. A district Chromebook will not work.

 , Tutorial Content:
 , Tutorial Content:
 , Tutorial Content:



 to access the information.