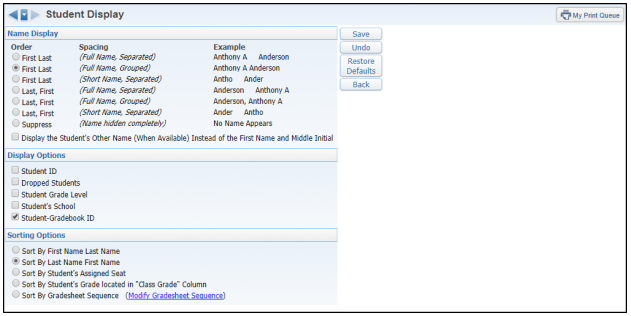
The Student Display allows you to modify the display of student information on the Gradebook Main Screen. Any changes made to the Student Display affect all of your Gradebooks and not just the one you are currently working in.
NAME DISPLAY: this allows you to determine how the student's name will display in your Gradebook.
OTHER OPTIONS
Student ID
Dropped Students
Student Grade Level
Student's School
SORTING: you will also have the option to select how the names will be sorted in your Gradebook.
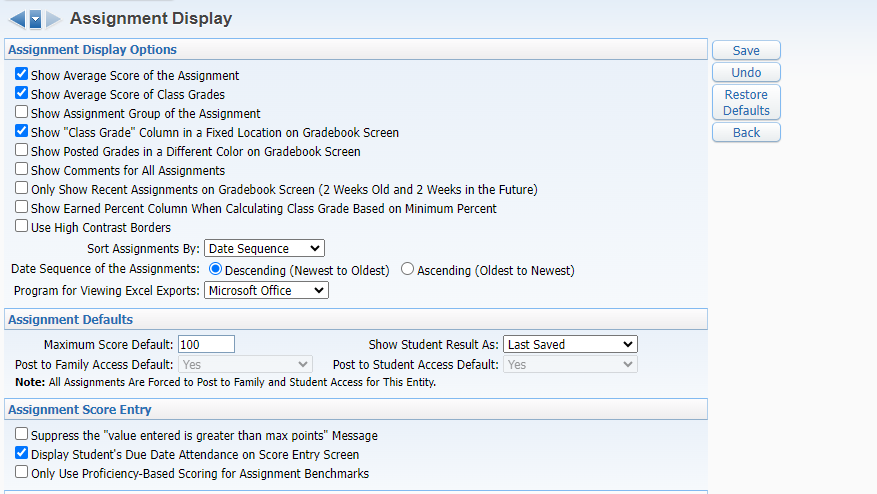
The Assignment Display allows you to establish user preferences of assignment detail information on the Gradebook Main Screen and assignment score settings. Changes made in this area will modify all your Gradebooks to reflect these settings.
Options include:
Show average of score assignment
Show average score of class grades
Show assignment group of the assignment
Show "Term Grade" column in a fixed location on Gradebook screen
Show posted grades in a different color on the Gradebook screen
Show comments for all assignments
Only show recent assignments on Gradebook Screen (2 weeks old and 2 weeks in the future)
Show Earned Percent Column when Calculating Term Grades based on Minimum Percent
Teachers have the option to sort assignments by Date, Category, or Assignment Group.
Tutorial Header: Grade Period Display, Tutorial Image: , Tutorial Content:
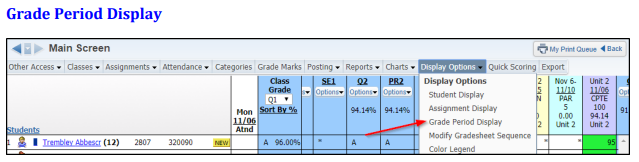
The Grade Period Display allows you to determine the grading period(s) that will display in the Gradebook. You will need to go into each individual Gradebook to determine the grading periods that display.
In this area, you can select which Grading Periods will display in your Gradebook. You can also put in specific assignment dates to only show those assignments within a given range of time. NOTE: if you put in specific dates for assignments to view, you will have to periodically update it to ensure you have access to the current period of time.
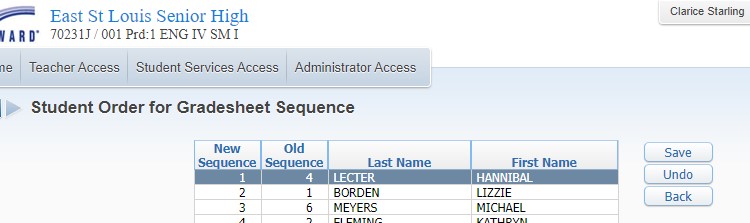
The Modify Gradesheet Sequence allows you to modify the order of the student’s name on the Gradebook Main Screen, if sorting based upon the Gradesheet Sequence.
Tutorial Header: Color Legend, Tutorial Image: , Tutorial Content:
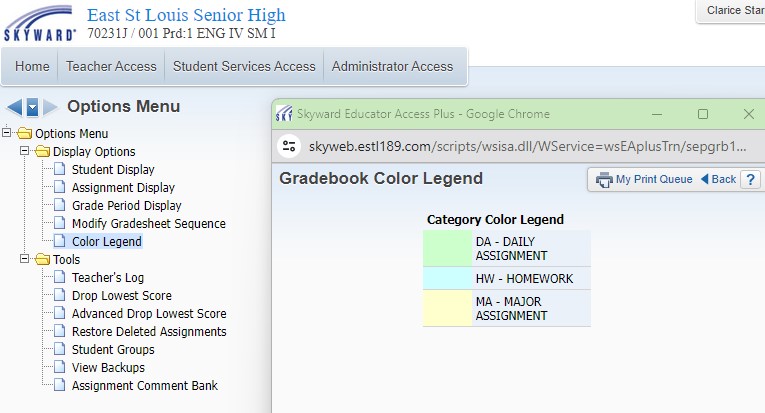
The Color Legend displays a legend of the categories used in the Gradebook and the posting status colors, depending if this has been selected in the Assignment Display Options.
A teacher's gradebook has different display options. In the gradebook, select the DISPLAY OPTIONS button to create your preferred view for your gradebook. This will allow you to customize your Gradebook.
In Skyward, go to the MY GRADEBOOK option under Teacher Access. Once there, select the gradebook for the course that needs to be updated.
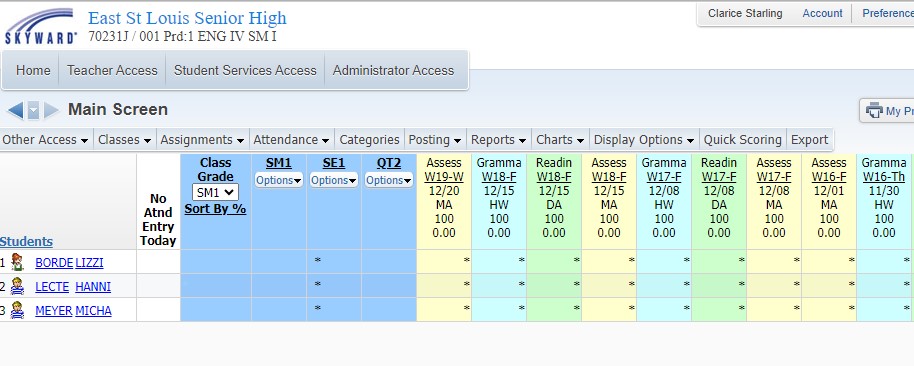
For the purposes of this tutorial, we will use Clarice Starling's 1st Semester English 4 class. She did not enter any grades during the semester and will now need to make updates for SM1 (Semester 1).
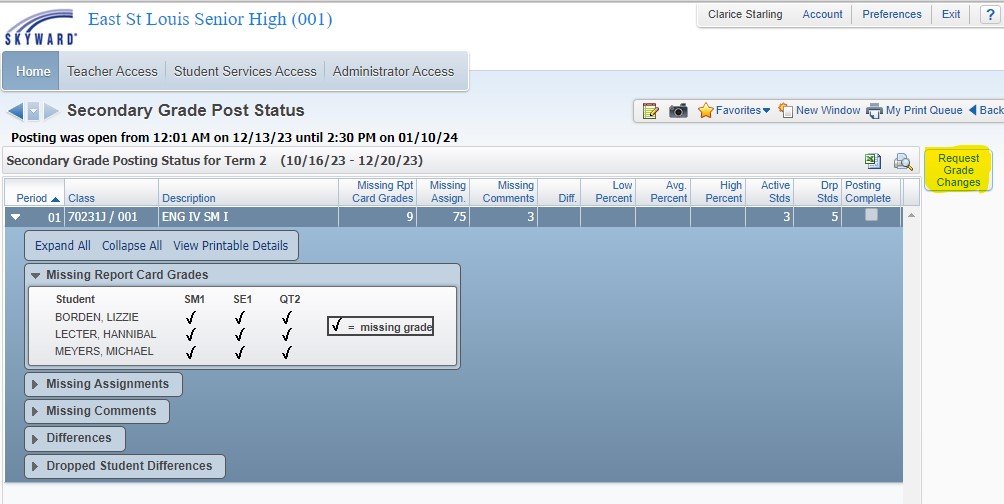
Once in the gradebook for the course, find the OPTIONS button under the term name for which a grade change request needs to be submitted. Choose the Grade Posting Status for (Term Name) from the options list.
When you get to this screen, you will see the dates and times the posting had been open for this term. If you click the triangle to the left of the row, you can see Missing Report Card Grades, Missing Assignments, Missing Comments, Differences, and Dropped Students Differences.
All of Ms. Starling's students are missing grades so she is going to select the REQUEST GRADE CHANGES button to the right.
Tutorial Header: STEP 3: Accessing the Gradebook for Grade Change Requests, Tutorial Image: , Tutorial Content:
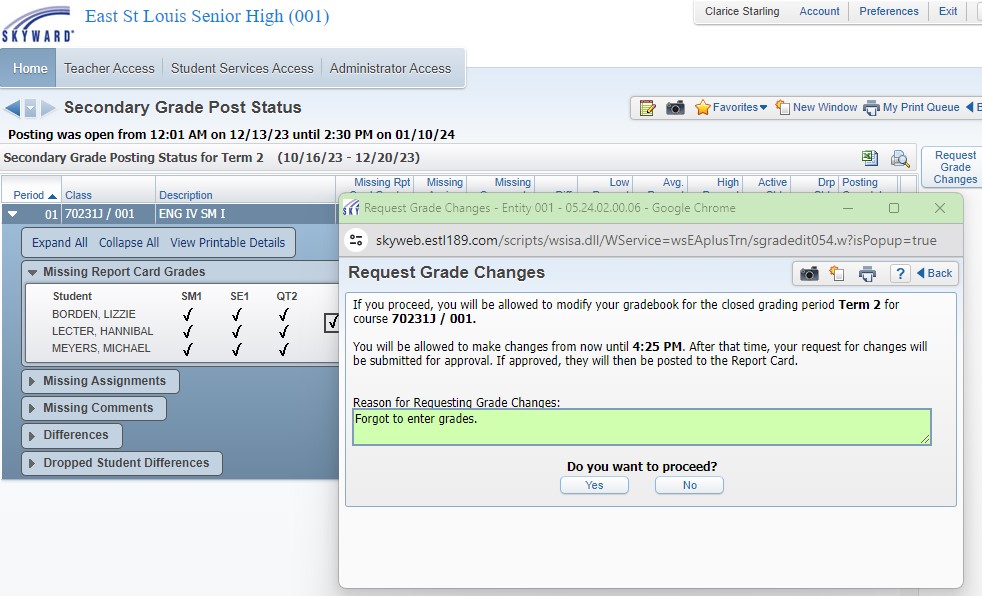
Once you hit the REQUEST GRADE CHANGES button, a popup screen will appear. Here you will input your reason for requesting the changes and access to the gradebook.
Once you enter your reason and select YES for the "Do you want to proceed?" question, you will have a 2-hour period of time to make any adjustments or updates.
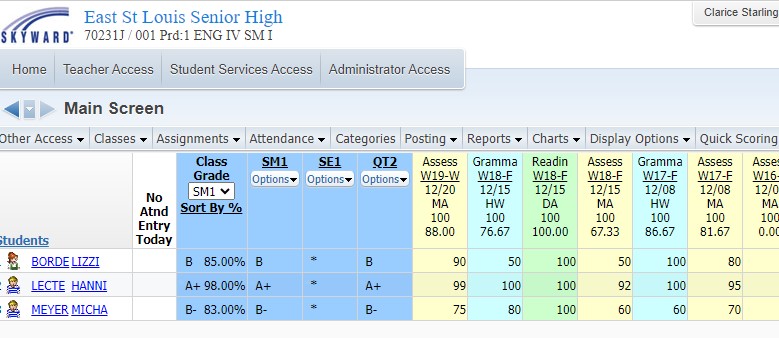
After proceeding with the Grade Change Requests option, you now have a two-hour period of time to access the gradebook.
Update assignments and grades as needed for the desired term by clicking on the appropriate assignment or grade to make updates..
Tutorial Header: STEP 5: Mark Grades as Complete, Tutorial Image: , Tutorial Content:
Once you have completed the updates for assignments and/ or grades, you will return to the OPTIONS button under the term name for which a grades have been updated. Choose the Grade Posting Status for (Term Name) from the bottom of the options list.
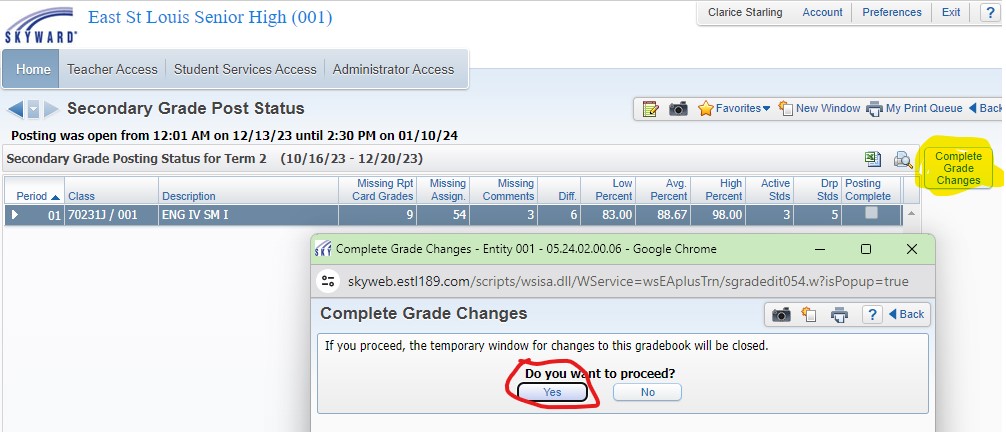
Now you have a new button to the right that says COMPLETE GRADE CHANGES. Once you hit the button, you will get a message that pops up and says the gradebook will be closed. If you are done, select YES to close the gradebook.
Tutorial Header: STEP 6: Approval for a Grade Change Request, Tutorial Image: , Tutorial Content:
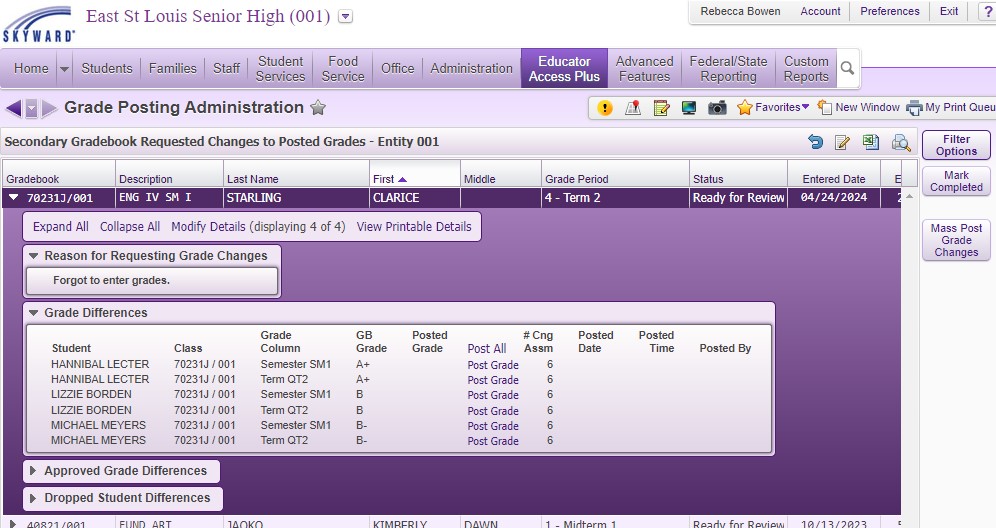
The grade changes will not post automatically for a student. Grade change requests have to be approved by someone with access to Grade Posting Administration. Changes for high school students will be made by the high school registrar and changes for middle school and elementary school students will be approved by whoever is managing Skyward.
Once approved, the updated grades will be available in Student and Family Access and on transcripts.
If a teacher finds himself in a position where a grade change is needed, either for a term grade or a specific assignment, it will be necessary to submit a GRADE CHANGE REQUEST within the gradebook in Skyward.
Tutorial Header: PreK to 5th Grade Attendance Overview, Tutorial Image: , Tutorial Content:
Teachers with students in Pre-K through 5th Grade will take attendance twice a day.
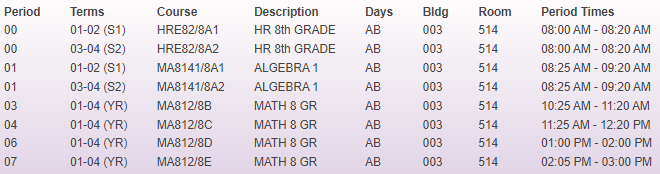
Your homeroom students will be scheduled to you twice with an AM homeroom (Period 1) and a PM homeroom (Period 2). You will be responsible for updating the attendance for homerooms only in Skyward. The bell schedule pictured above shows how students earn their minutes for school attendance.
NOTE: all of your academic courses should be scheduled in Period 00. If you have an academic course scheduled in either Period 1 or Period 2 and the system is expecting attendance, this is an error. Please notify the SIS Director to get this corrected.
Secondary teachers will take daily attendance for each period that students are scheduled in their class.
The bell schedule varies between the different secondary campuses. The picture above shows the periods a MCMS teacher has students scheduled to her. She will be responsible for posting daily attendance for each of these periods in Skyward.
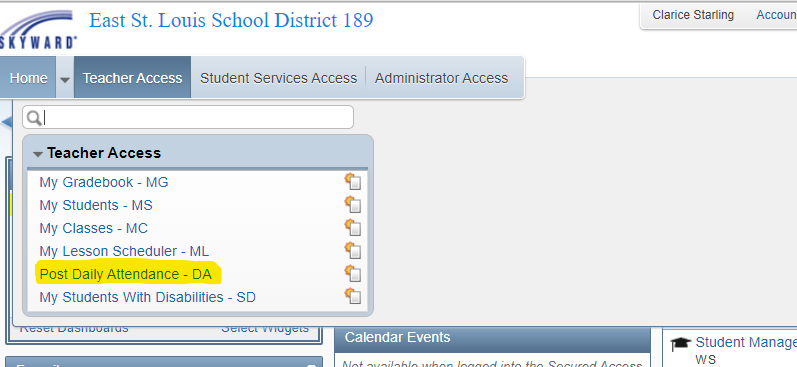
To post your daily attendance, you will be on the Educator Access Plus side of Skyward. Click on the TEACHER ACCESS button and then select the POST DAILY ATTENDANCE - DA option from the dropdown menu.
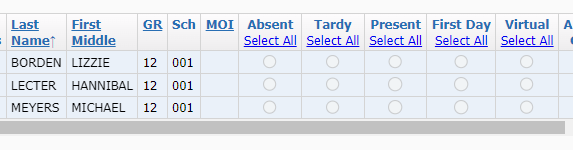
Once you have accessed the Post Daily Attendance area in Skyward, you will select the name of the class for which you are taking attendance. Click on the BY NAME option for that class and you will get a list of students in order by name to take attendance.
The default for attendance will be PRESENT unless you input another option. Mark any student whose name is showing but not present as ABSENT. Mark the appropriate fields for each student and then press SAVE to ensure it is posted.
FIRST DAY - you must mark this field for the first day that a student is in your class. This will help office staff determine what the entry date for a student should be for the year.
NOTE: even if all students are PRESENT, you will still need to save the entries for the attendance to post. Failure to do this will result in the office getting a notification that you have not taken attendance.
Tutorial Header: Updating for Tardy Students, Tutorial Content:
If you have posted attendance and marked a student as ABSENT, but then the student arrives late, you will have to update the record for that class.
You can reopen the attendance for that class and then click on the TARDY bubble for the student. Click SAVE when finished.
Changes can only be made to a student's record on the same day. If you failed to change an ABSENT to TARDY or if some other item needs to be updated, you will need to reach out to the attendance clerk for your school.
All teachers will take daily attendance in Skyward. The purpose of this article is to review this process.
Tutorial Video URL: https://support.skyward.com/deptdocs/Corporate/Documentation/Public%20Website/Training/Media/Student_Records/Standards_Gradebook/2265686_Add_Event.mp4, Tutorial Link Title: Adding an Event VIDEO PRESENTATION
The Standards-Based Gradebook is used by teachers with students in Kindergarten and 1st Grade, as well as the teachers at Gordon Bush Alternative Center.
This type of gradebook tracks a student's progress toward mastery of specific learning targets for the course and is different than a...
Confirm you are trying to log in using the correct username and password.
Your username and password are the same as your computer login information, not your email account.
Tutorial Header: Confirm Your Account is Not Due for a Password Reset., Tutorial Content:
This needs to be done from a District PC on the District Network. This cannot be done from a Chromebook, a non-district computer, or while outside of the buildings.
Completely reboot the device if you are currently logged in.
At the windows login screen, enter your account information as normal. You will be prompted to set a new password if you are due for a reset. If you did have to reset your password, now that new password is the one you will use to log into Skyward.
Tutorial Header: New Staff Members, Tutorial Content:
If you are a new staff member, verify with your Department Head or Principal that a Skyward Access form has been submitted for access on your behalf. If you have not filled out a Skyward Request Form, you will have to complete this process before gaining access to the system.
Are you trying to log into Skyward but get an error message that your password is wrong?
THE MOST LIKELY CAUSE OF ISSUES RELATED TO LOGGING INTO SKYWARD ARE BECAUSE IT IS TIME TO RESET YOUR PASSWORD FOR LOGGING INTO A DISTRICT COMPUTER. THIS HAS TO BE DONE ON A DISTRICT COMPUTER THAT IS...
Tutorial Header: PRINTING ALL ROSTERS, Tutorial Image: , Tutorial Content:
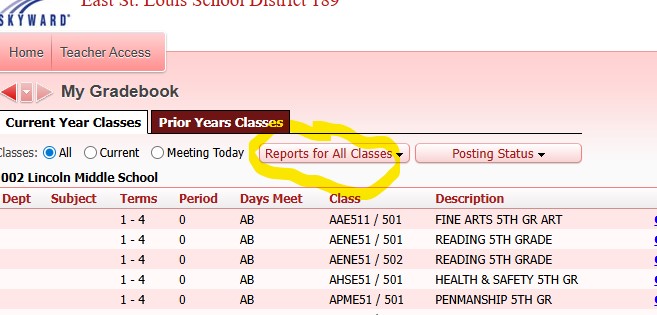
To print rosters for all your classes, log into Skyward and select MY GRADEBOOK - MG under the Teacher Access options. Once you are there, you will see a list of your scheduled classes.
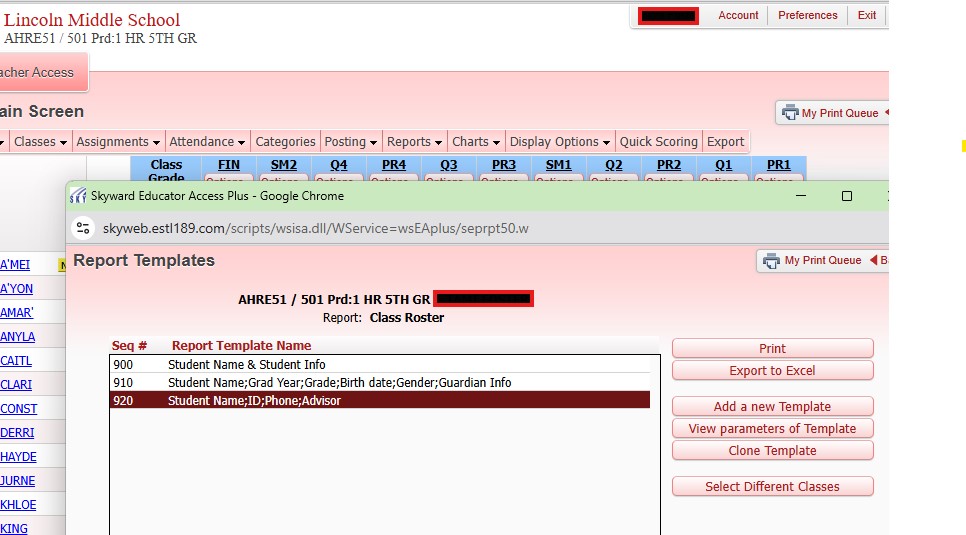
From this location, you will see a button that says REPORTS FOR ALL CLASSES. After you click on that button, scroll down to CLASS INFORMATION - CLASS ROSTER and click on it. A window pops up with available templates. You can select one of the available templates or create your own by clicking the ADD A NEW TEMPLATE button. When you are ready, select the PRINT button and all of your class rosters will print.
Tutorial Header: PRINTING ROSTER FOR A SINGLE CLASS, Tutorial Image: , Tutorial Content:
The other option is to print an individual roster for one class at a time. To do this, click on the GRADEBOOK hyperlink next to the name of the class from the list on the MY GRADEBOOK section in Skyward.
Once you are inside the gradebook, select REPORTS and scroll down until you see the CLASSINFORMATION - CLASS ROSTER option. This will take you to the available templates. From there you will select your desired template by highlighting its name and then hit the PRINT button.
This process will print only the roster for the class whose gradebook you are in. You can add more classes in this screen by hitting the SELECT DIFFERENT CLASSES button and selecting the classes to include.
Many schools request that teachers create a file or folder for substitute teachers to be used in the event of a teacher absence. While the requested materials that your school asks you to include in your folder may vary, standard practice is to include a printed roster for each class that...
East St. Louis District 189 implemented Cisco Duo, a cloud-based multi-factor authentication (MFA) solution, in September 2025. This app strengthens account security for all staff for a variety of software access. You must have this app installed on your cell phone to access Skyward on your laptop.
NOTE: even with the Cisco Duo app, you will not be able to use a district Chromebook to access Skyward.
Your laptop will need to be connected to the district's VPN (virtual private network) in order to access Skyward. You will log into your district laptop using your credentials, ensuring that the device is connected to your home's WiFi connection. Your screen will be blank and you will get an error message; the screen will show only the RECYCLE BIN.
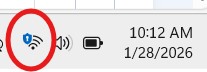
Navigate to the lower right-hand corner to access the WiFi settings on your laptop. Click on the WiFi option and locate the VPN option in the upper right-hand corner of the WiFi settings pop-up. When you get to this point, you will want to click CONNECT.
Tutorial Header: THREE: Confirm Connection through Cisco Duo app, Tutorial Image: , Tutorial Content:
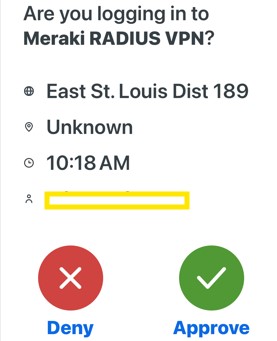
While you are completing the steps to access the VPN, you will need to have your phone nearby with the Cisco Duo app open. After a few moments of selecting CONNECT from the VPN area, your Cisco Duo app will ask you if you want to approve the connection. The picture shows what you will see; you must select APPROVE to connect to the VPN.
Once you select the APPROVE option, the VPN setting will change to CONNECTED.
If you have icons on your desktop that you use to access various platforms, you will need to wait up to 5 minutes for your desktop to load. From there, you can see the SKYWARD icon to access the system.
If you are having issues with your desktop icons loading, you also have the option to use MicroSoft Edge. If you click on the 4 blue squares to the left of your SEARCH bar on the bottom of your laptop, you will see the web browser MicroSoft Edge is pinned. You can open MicroSoft Edge, navigate to estl189.com, and then select the SKYWARD ACCESS icon.
From there, use your district credentials to log into Skyward to take attendance, utilize your electronic gradebooks, or run any needed reports.
The purpose of this article is to review the process for accessing Skyward from your district laptop while working from home on E-Learning Days.
NOTE: you may only access Skyward using a district-issued laptop. A district Chromebook will not work.

 , Tutorial Content:
 , Tutorial Content:
 , Tutorial Content:
 , Tutorial Content:
 , Tutorial Content: